A system timer job runs overnight which uses the leave parameters to calculate each employee’s daily leave balance. These daily leave balances are not saved in Lanteria HR. This means that updating the leave parameters of an employee in the middle of the year will cause the new parameters to be applied for the whole year and an adjustment will need to be made.
As leave is recalculated daily, changes to leave parameters should be made on the day the changes take effect for the employee and the business.
Leave Parameters
Leave Parameters are:
- Continuous service start date
- Carried over balances
- Work pattern
- Absence Plan
- Location
- Employment date
- Public/company holidays
- Manual adjustments
- Leave taken
- Date of the leave balance calculation
Absence Plan Changes
When the rate at which employee(s) accrue leave needs to be updated, you will need to make an absence plan change. This may apply in cases such as:
- When a new employment agreement takes effect
- Rules regarding leave and accruals change
- When employees move to a new location where different leave rules apply
To make an Absence Plan change for all employees on the same absence plan, you can directly edit the absence plan from: Time & Attendance > Absence Plans > Actions > Details. This is an absence plan change to all employees on the absence plan and will affect the accrual rate and balances of all employees on the absence plan.
To make an absence plan change for a single employee, you will need to switch the employee to a different absence plan by changing the value in the Absence Plan field on the employee card. If there are no suitable absence plans to switch to, you will need to first create a new absence plan. This is an absence plan change to one employee and will only affect the accrual rate and balances of the employee in question.
To make an absence plan change:
- Open the employee card of an employee, and then, on the General tab, click Absences.
- In the Employee Absence Summary window, note the current value of the employee’s Accrued leave and Leave Balance for each accruing leave type (e.g. Annual Leave, Personal Leave and Long Service Leave). Do this for every employee. For multiple employees on the same absence plan, you can locate and note their Accrued leave and Leave Balance on the My Team Absence Statistics report in the Manager role: My Team Attendance > Absence Statistics.
- Make the absence plan change by either switching an employee’s absence plan (the Absence Plan field on the employee card) or editing the absence plan directly (Time & Attendance > Absence Plans > Actions > Details).
- Go to Settings > Settings and Configuration > System Settings > System Jobs.
- Click Run Now for the LHR – Process Absence Plans job and wait for the employee(s)’ leave balances to update after the job is completed.
- Note and compare the Accrued leave and Leave Balance for each accruing leave type after these changes (e.g. for Annual Leave, Personal Leave and Long Service Leave).
- Make a current year manual adjustment of the accrued leave on the employee’s Accrued amount for each of the accruing leave types so that the Accrued and Leave Balance are equal to their original values before the change (the value in step 2).
- Compare the Accrued leave and Leave Balance after the manual adjustment with that of the original recorded values in Step 2 and verify the employee’s leave has now remained the same.
Example
Adam is on the Canada absence plan and must be moved to the USA absence plan (with different accrual rates).
- We open Tanya's employee card, and then, on the General tab, click Absences.
- In the Employee Absence Summary window, we set the Report Date field to the current date.
- We note the employee’s Accrued value and Leave Balance for each accruing leave type (in this case, Vacations and Sick Leave).
.png)
- Vacations: Accrued 18, Leave Balance 24
- Sick Leave: Accrued 5, Leave Balance 5
- We switch Tanya’s absence plan on the employee card (the Absence Plan field value), and then click Save.
- We go to Settings > Settings and Configuration > System Settings > System Jobs.
- We click Run Now for the LHR – Process Absence Plans job and wait for Tanya's leave balances to update.
- In the Employee Absence Summary window for Tanya, we note and compare the new Accrued value and Leave Balance for each accruing leave type after our changes (Vacations and Sick Leave).
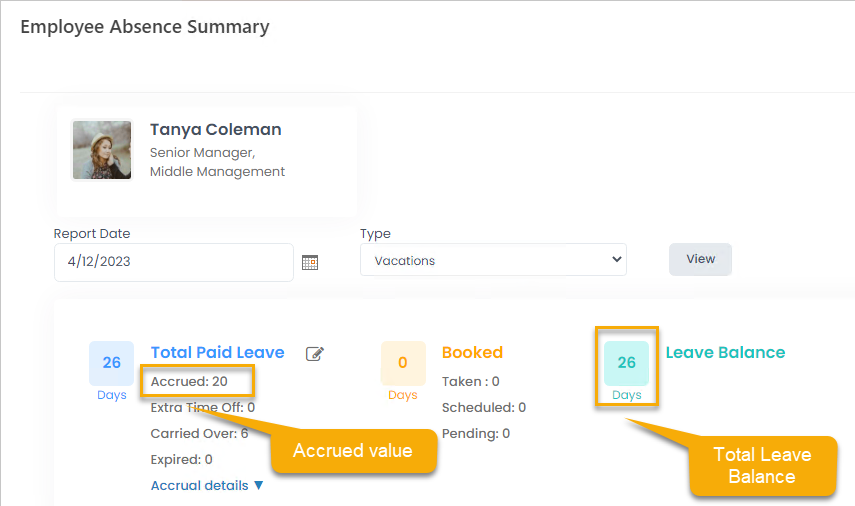
- Vacation: Accrued 20, Leave Balance 26
- Sick Leave: Accrued 4, Leave Balance 2
- We make a current year manual adjustment of the accrued leaveon Tanya’s accrued amount for each of the leave types so that the Accrued and Leave Balance are equal to their original values before the change (in step 3), i.e.:
- Vacation: Accrued (before) 18, Accrued (after) 20 Adjustment to make: -2
- Sick Leave: Accrued (before) 5, Accrued (after) 4 Adjustment to make: +1
- We observe and verify that the Accrued leave and Leave Balance after the manual adjustment are the same as the original recorded values.
Work Pattern Changes
A work pattern change may apply in such cases as:
- Employee(s) changes from part-time to full-time or vice-versa
- The working hours and/or days of employee(s) have changed
To make a work plan change for all employees on the same Work Pattern, you can edit the work pattern from: Settings > Settings and Configuration > Time and Attendance > Work Patterns > Edit. This is a work pattern change to all employees on the work pattern and will affect the accrual rate and balances of all employees on the work pattern.
To make a work pattern change for a single employee, you will need to switch the employee to a different work pattern by changing the Work Pattern field value on the employee card. If there are no suitable work patterns to switch to, you will need to first create a new work pattern. This is a work pattern change to one employee and will only affect the accrual rate and balances of the employee in question.
If the business’ working hours have changed, and the number of hours of leave accrued per year has changed to follow suit, you may require an absence plan change as well as a carried over balance adjustment.
To make a work pattern change:
- Open the employee card of an employee, and then, on the General tab, click Absences.
- In the Employee Absence Summary window, note the current value of the employee's Accrued leave and Leave Balance for each accruing leave type (e.g. Annual Leave, Personal Leave and Long Service Leave). Do this for every employee.
- Make a work pattern change by either switching an employee’s work pattern (the Work Pattern field on the employee card) or editing the work pattern directly (Settings > Settings and Configuration > Time and Attendance > Work Patterns > Edit).
- Go to Settings > Settings and Configuration > System Settings > System Jobs.
- Click Run Now for the LHR – Process Absence Plans job and wait for the employee(s)’ leave balances to update after the job is completed.
- Record and compare the Accrued leave and Leave Balance for each accruing leave type after the changes (e.g. Annual Leave, Personal Leave and Long Service Leave).
- Make a current year manual adjustment of the accrued leave on the employee’s Accrued amount for each of the accruing leave types so that the Accrued and Leave Balance are equal to their original values before the change (the value in step 2).
- Compare the Accrued leave and Leave Balance after the manual adjustment with that of the original recorded values in step 2 and verify that the employee’s leave has now remained the same.
Example
Roy, a full-time employee, is transitioning into a part-time position, and we need to change his work pattern.
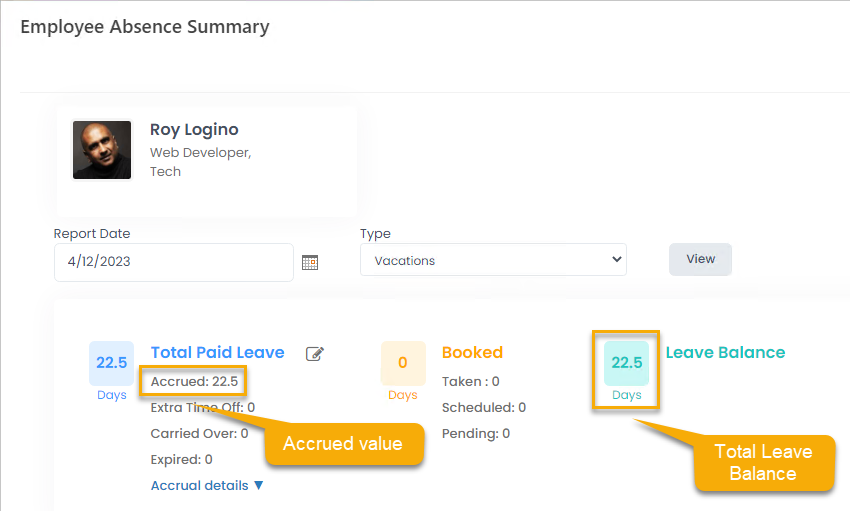
- We open Roy's employee card, and then, on the General tab, click Absences.
- In the Employee Absence Summary window, we set Report Date field should to the current date.
- We note Roy’s Accrued value and Leave Balance for each accruing leave type (e.g. Vacation, Sick Leave):
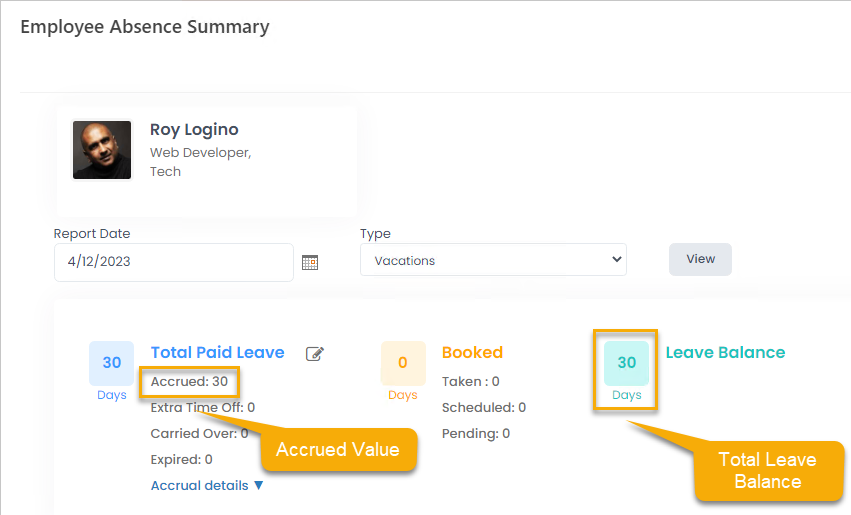
- Vacation: Accrued 30, Leave Balance 30
- Sick Leave: Accrued 10, Leave Balance 8NoteObserve that the values above have changed.
- On Roy's employee card, we switch Roy’s work pattern (the Work Pattern field value), and then click Save.
- We go to Settings > Settings and Configuration > System Settings > System Jobs.
- We click Run Now for the LHR – Process Absence Plans job and wait for Roy’s leave balances to update.
- We note and compare the new Accrued value and Leave Balance for each accruing leave type after the changes (e.g. Vacation, Sick Leave).
- Vacation: Accrued 22.5, Leave Balance 22.5
- Sick Leave: Accrued 7, Leave Balance 5
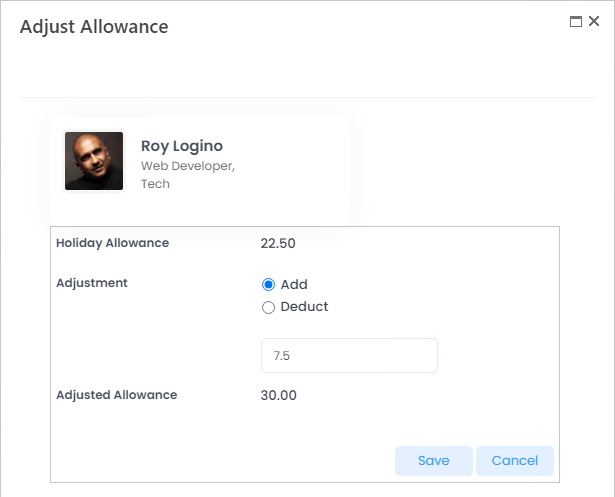
- We make a current year manual adjustment of the accrued leaveon Roy's Accrued amount for each of the leave types such that the Accrued and Leave Balance are equal to their original values before the change (in step 3) i.e.:
- Vacation: Accrued (before) 30, Accrued (after) 22.5 Adjustment to make: +7.5
- Sick Leave: Accrued (before) 10, Accrued (after) 7 Adjustment to make: +3
- We observe and verify that the Accrued leave and Leave Balance after the manual adjustment are the same as the original recorded values.
Carried Over Balance Adjustment
The Carried Over Balance is the Opening Balance of Leave at the beginning of each reporting year before any accruals or deductions. It is also the Closing Balance from the previous year.
The Carried Over Balance is generated on the rollover date, and it is the only leave balance that is permanently saved in Lanteria HR (the system records this value and does not overwrite it, unless the Carried Over Recalculation job is run).
We may need to adjust the Carried Over Balance when:
- Making changes or adjustments to accruals, leave taken or balances of prior years
- A new or re-hired employee brings in existing leave from outside the organization (when an employee has a non-zero leave balance on their first employment date)
You can adjust the carried over records automatically, if some change was made that concerns a number of employees or modify a carried over record manually. To make a manual Carried Over Balance Adjustment:
- Click Time and Attendance > Absence Lists > Vacation Carried Over.
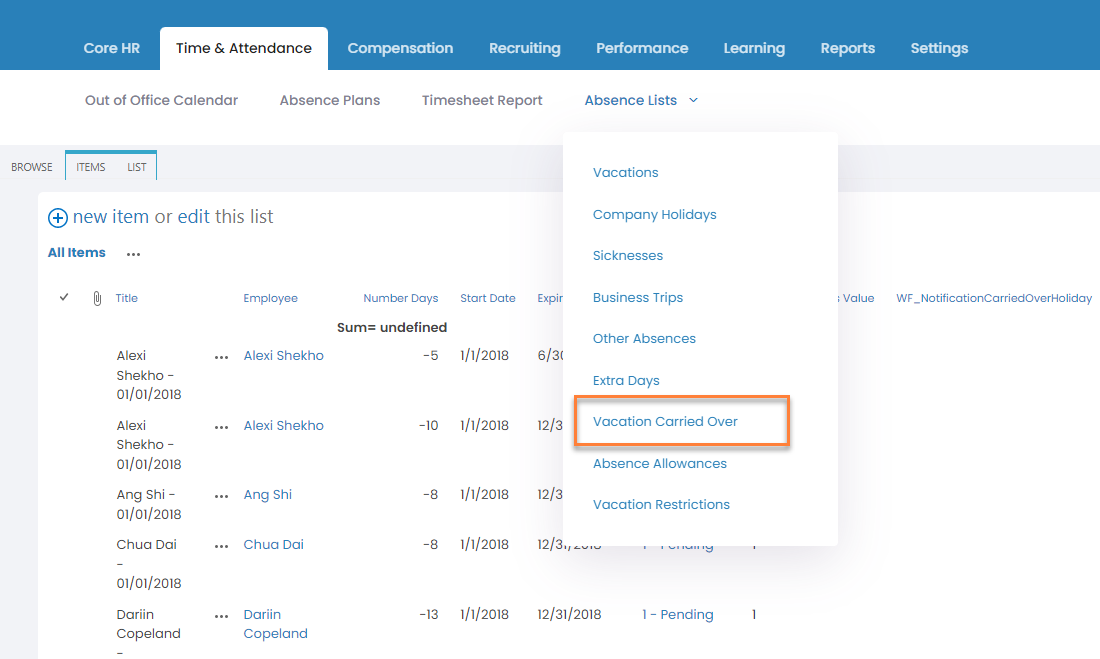 The Carried Over Accrual Days list opens.
 - Locate the Carried Over record with the corresponding employee, leave type, start date and expiration date. In the case of a new employee, if the Carried Over record does not exist, you will need to create one instead.
- Select the Carried Over record, and then click Edit Item.
- Update the carried over amount to the desired value, and then click Save.
- Open the employee card, and then, on the General tab, click Absences. In the Employee Absence Summary window, verify the employee’s Leave Balance.
Example
Alexandra’s is a new employee and her current Carried Over Balance is 0 for Vacation. Alexandra had an existing 5 days of Vacation in her prior place of employment, and the organization has agreed to recognize the leave entitlements from her prior employer.
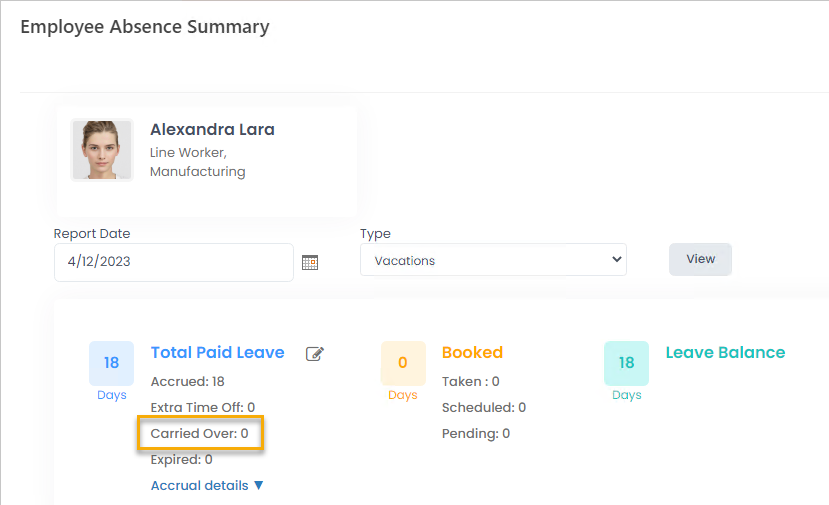
- We open Alexandra's employee card, and then, on the General tab, click Absences.
- In the Employee Absence Summary window, we set the Report Date field to the current date.
- We observe Alexandra’s Carried Over value is 0 for Vacation.
- We click Time and Attendance > Absence Lists > Vacation Carried Over. The Carried Over Accrual Days list opens.
- We locate the Carried Over record for employee Alexandra, leave type: Vacation, start date: 1/1/2023 and expiration date 12/31/2023.
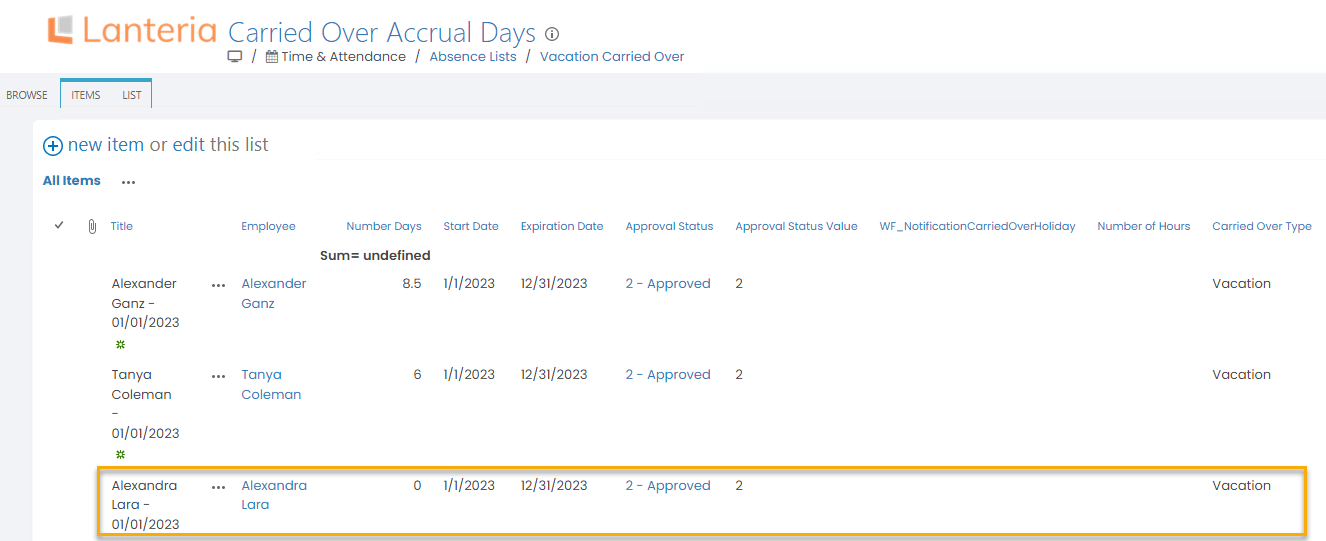
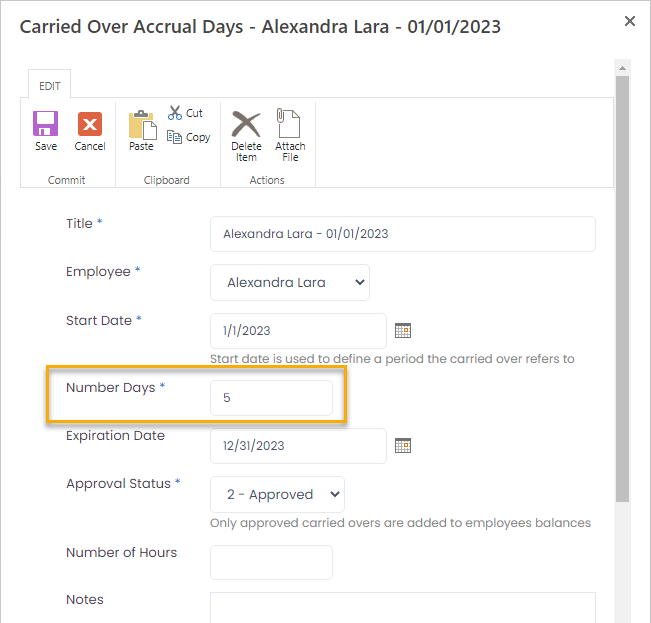
- We select the Carried Over record, and then click Edit Item. Then we update the carried over amount to 5, and then click Save.
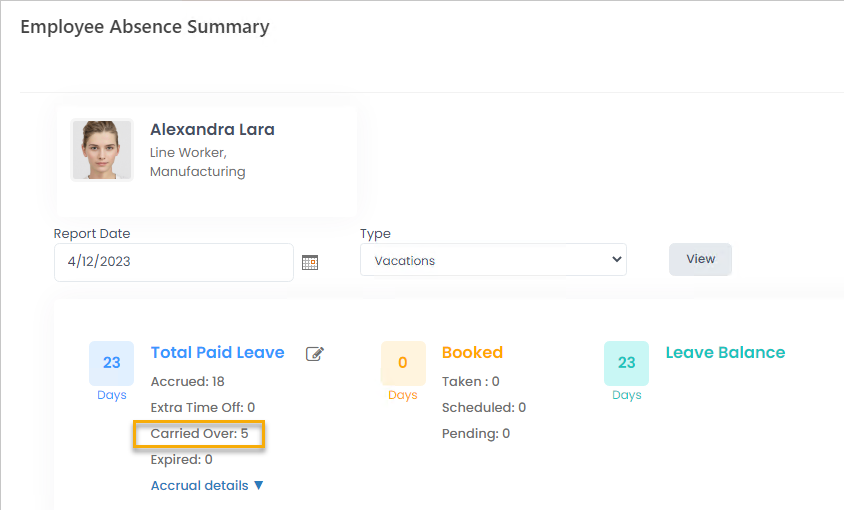
- We return to Alexandra's Employee Absence Summary to verify the Carried Over Balance for Vacation is now 5 days.
If there is no carried over record for the employee the balance is to be updated for, create a new one by clicking New Item in the Carried Over Accrual Days window.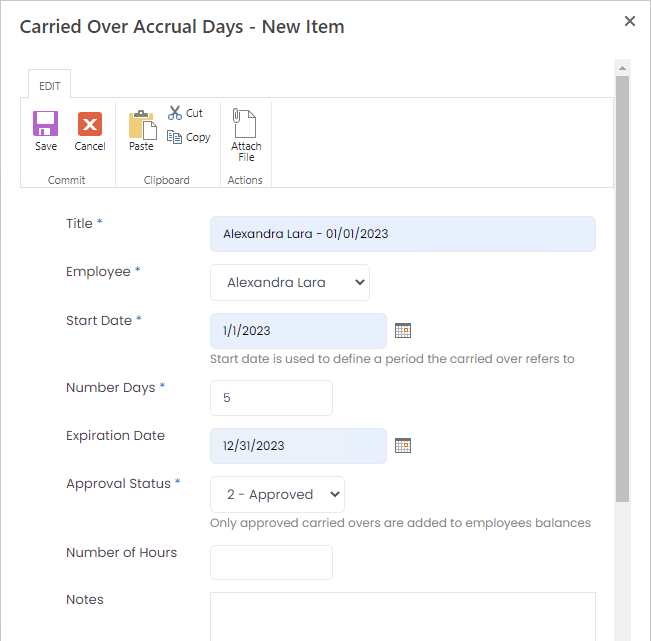
Continued Service Start Date Changes
The continuous service start date is an anniversary date of an employee’s long service leave recognition. Employees may bring in an existing continuous service start date from other recognized organizations, but for those who don’t, this will be identical to the employee’s employment date.
In the case where an employee’s continuous service start date needs to be changed, this can affect the amount of leave an employee has accrued (for all accruing leave types) for the current reporting year.
The effects to leave accruals and the method of making a continuous service start date change will generally be identical to that of making an employment date change (see below).
To make a change to the continued service start date, follow the guide and examples in employment date changes below.
Employment Date Changes
In the case where an employee’s Employment Start Date needs to be changed, this can affect the amount of leave an employee has accrued (for all accruing leave types) for the current Reporting Year.
To make an adjustment for an Employment Date Change:
- Open the employee card of an employee, and then, on the General tab, click Absences.
- In the Employee Absence Summary window, note the current value of the employee's Accrued leave and Leave Balance for each accruing leave type (e.g. Annual Leave, Personal Leave and Long Service Leave).
- On the employee card, update the employee’s employment date in the Employment Date field (or Continuous Service Start Date).
- Go to Settings > Settings and Configuration > System Settings > System Jobs.
- Click Run Now for the LHR – Process Absence Plans job and wait for the employee’s leave balances to update after the job is completed.
- Note and compare the Accrued leave and Leave Balance for each accruing leave type after the date changes (e.g. for Annual Leave, Personal Leave and Long Service Leave).
- Make a current year manual adjustment of the accrued leave on the employee’s Accrued amount for each of the accruing leave types so that the Accrued and Leave Balance are equal to their original values before the date change (the value in Step 2).
- Compare the Accrued leave and Leave Balance after the manual adjustment of the accrued leave with that of the original noted values in step 2 and verify that the employee’s leave has now remained the same.
Example
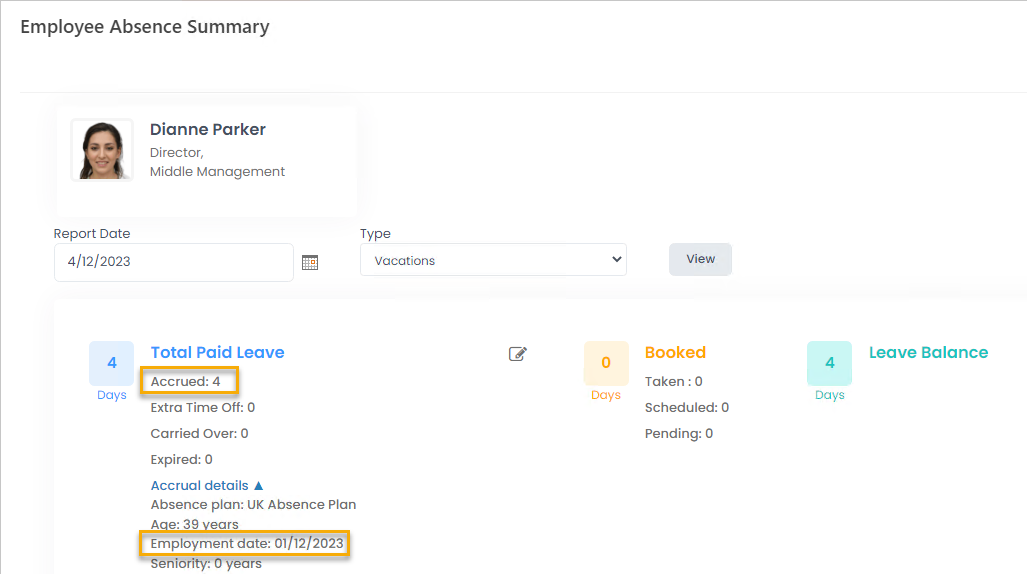
Dianne’s employment date is 2/12/2023. The organization has agreed to recognize that Dianne started service with the organization on the earlier date of 1/12/2023. We need to change the employment date and make the corresponding adjustments.
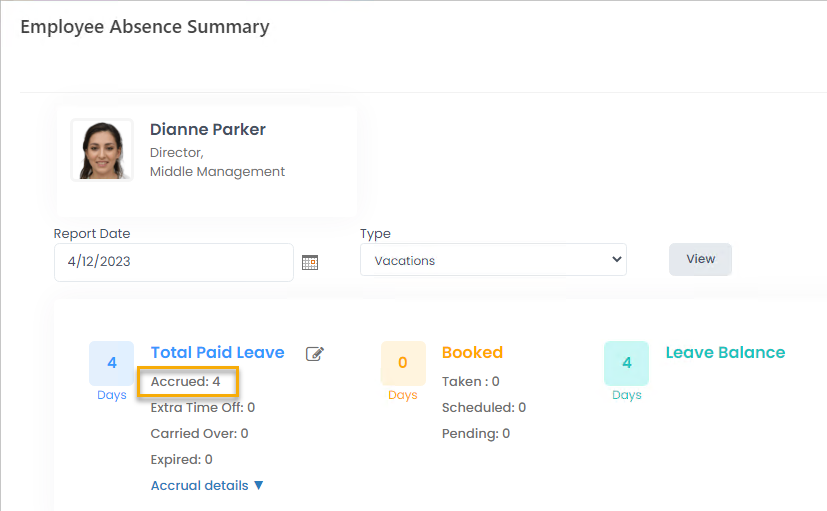
- We open Dianne's employee card, and then, on the General tab, click Absences.
- In the Employee Absence Summary window, we set the Report Date field to the current date
- We note Dianne’s Accrued value and Leave Balance for vacation, which is 4 days.
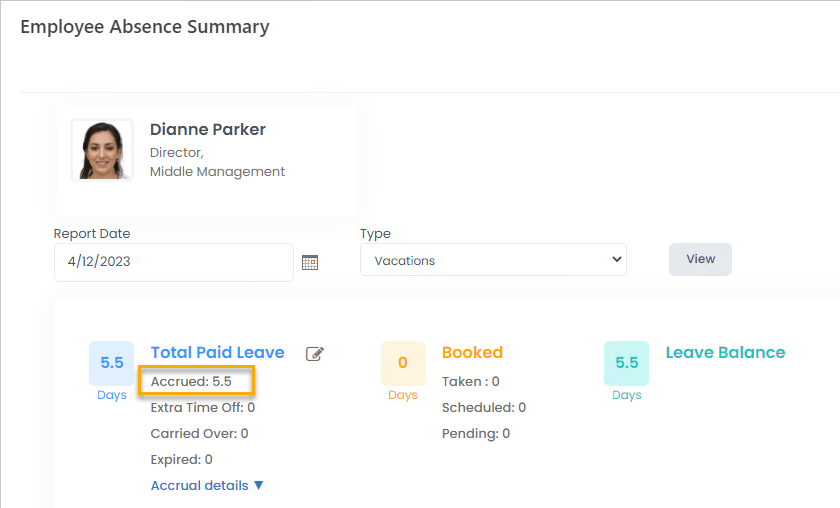
- On Dianne's employment card, in the Employment Date field, we change Dianne's employment date to 01/12/2023, and then click Save.
- We go to Settings > Settings and Configuration > System Settings > System Jobs.
- Click Run Now for the LHR – Process Absence Plans job and for Dianne’s leave balances to update.
- We note and compare the new Accrued value and Leave Balance for vacation.
- We make a current year manual adjustment of the accrued leave on Dianne's Leave Balance amount for the vacation leave type so that the new Leave Balance is equal to the original value before the change (in step 3).
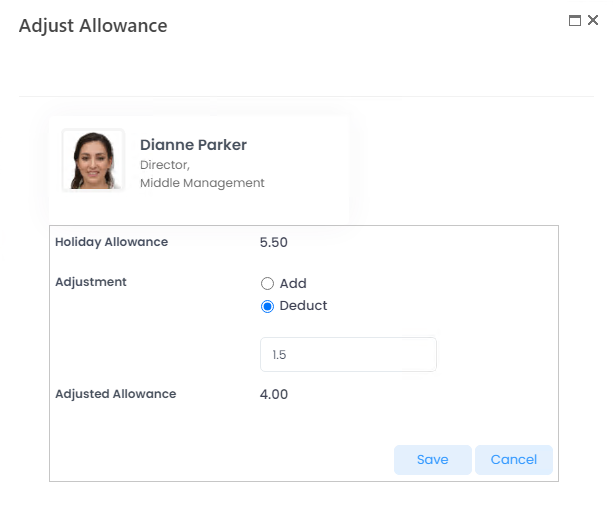
- In Dianne's Employee Absence Summary, we observe and verify that Leave Balance after manual adjustment of the accrued leave is the same as the original noted value of 4 hours.