In Lanteria HR users can set up custom approval workflows for various processes that are managed through the system.
For example, in Lanteria HR absences are by default set to be approved by the employee's manager. If the company policy specifies another approval process (for example, an approval from both the employee's manager and HR), it can be set up using approval workflows.
You can also set up approvals for processes that do not require approval by default, for example, creation of a new position or an employee termination.
Approval can be done in several steps with different roles (Manager, HR, Org Unit Manager, etc.) or specific people being responsible for each step. The result of each step can be an approval or just feedback.
Employees can view, initiate and process approval requests through the Employee role menu by clicking My Details > My Approval Requests section.
The Approval Recipient field specifies the employee for whom the approval is requested. The Initiator field specifies the employee who initiated the approval request.
On the Require My Action tab, you can see the requests pending your approval. Click View Item to view the details of the request. Click Approve/Reject to approve, reject, or request change. On the Created by Me tab, you can see requests created by you.
.png)
In the HR role, to view approval requests, go to Core HR > Approval Requests.
.png)
Select the Show Active Only check box to manage only active approval requests. You can also set a filter by approval process as well as set other standard additional filters if necessary. In the HR role, you can approve/reject approval requests instead of the currently responsible employee if necessary. Click View Item to view the details of the request. Click Approve/Reject to approve, reject, or request change.
Create an Approval Workflow
Follow these steps to create an approval workflow:
- Go to Settings > Settings and Configuration > Core HR.
- Click Processes and Approval Workflows in the left panel and click Edit next to the Approval Workflows setting name on the Basic tab.
.png)
- The Approval Process Settings form will appear. Click the Approval Workflows button to open the Approval Workflows form.
.png)
- Click the Add New button to create a workflow.
.png)
- Specify the title and description for the workflow in the Title and Description fields respectively and click Save.
The Approval Workflow Steps window will open. Use it to add steps to the workflow.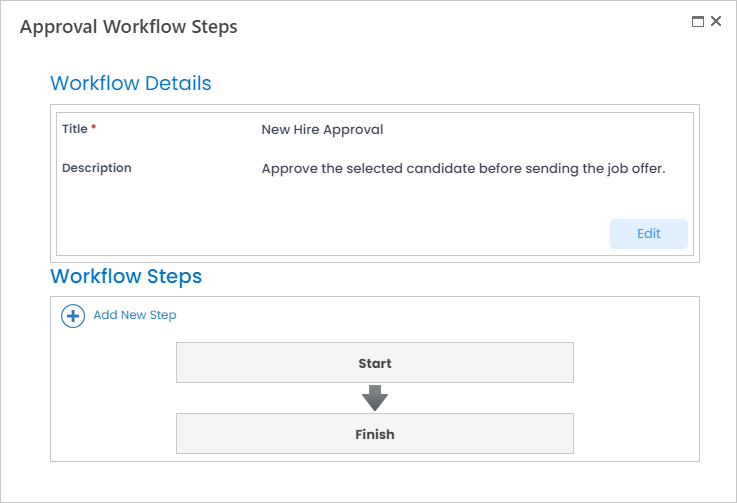
- Click the Add New Step button to create a step.

- Enter the title for the current step into the Title field.
- Use the Step Order field to specify the sequence of steps in the current workflow. This field will be filled in automatically by the next number in the sequence, but it can be changed by the user.
- Select the type of action that is to be performed at this step from the Step Type drop-down list. The options are:
- Approval, which means that the person responsible for this step is to approve or reject the request
- Feedback, which means that the person responsible for this step should only provide feedback on the request
- Set up the due date for the step in the Duration in Days field. Specify the number of days within which the responsible person is to provide feedback or approval and the system will calculate the due date and send the reminder to the responsible.
- Select the person responsible for the current step from the Approver drop-down list. The following options are available:
- Employee: the employee for whom the approval request has been created. For example, if it is an absence approval the responsible would be the employee requesting the absence.NoteThe SharePoint list for which the approval process will be set up must have one of the following fields: Employee, Requested by, Department. Based on this field and the option selected in the Approver field, the responsible approver will be defined.
- Manager: the manager of the employee for whom the approval request has been created.
- Second Level Manager: the manager of the employee's manager.
- Managers: all the managers of the employee according to company hierarchy. The approval request is first sent to the direct manager, then his or her manager and so on to the last top manager. If you select this option, an additional Top Level Job Roles field appears that allows you to stop the climb up the hierarchy at any manager level. To do that select the last role (or roles, if there are several job roles at the same level) in the hierarchy that has to approve the request. For example, if there is no need for CTO's and CEO's approval and their subordinates are Marketing Director, Operations Director and Production Director, you should select Marketing Director, Operations Director and Production Director as Top Level Job Roles in this field.
- Additional Manager: additional manager(s) of the employee for whom the approval request was created.
- Org Unit Manager: the manager of the org unit defined either by the Employee field, if the approval process is started for an employee, or Org Unit field, if the list item under approval does not have the Employee field, as, for example, in case of a new job opening approval.
- Org Unit Managers: all the organizational unit managers by hierarchy starting from the first manager defined by the Employee field or Org Unit field. The reach of the approval process up the hierarchy can be limited with the help of the Top Level Job Roles field similar to the Managers option. To do this, select the last role that has to approve the request and the approval process will stop there.
- HR: all the employees holding the HR role will have the item assigned to them for approval.
- Local HR: the approvers will be Local HRs who have access to the employee or department information from the list
- Select by Job Role: employee(s) with a specific job role will be responsible for approval. If you select this option, an additional Job Role field will appear where you should select the necessary job role.
- Select Approver Manually: any employee. If you select this option, an additional Select Approver field will appear where you should select the employee who is to be assigned responsible for approval.NoteIn case an approval request is initiated by an employee who was manually selected as approver in the corresponding approval workflow step, such an approval request will be approved automatically.
- Working Group: the approvers will be employees assigned to a working group. If you select this type of approver, the Working Group field becomes available where you need to select a working group, the employees of which will be approvers of this workflow step.
- Employee: the employee for whom the approval request has been created. For example, if it is an absence approval the responsible would be the employee requesting the absence.
- In case there is more than one approver, select one of the following options in the Approval Type field:
- Any Approver: the workflow step is completed as soon as any of the responsible approvers completes the action.
- All Approvers: the workflow step is completed only after all the responsible approvers complete the action.
- The Action Form URL field that by default is hidden under the Advanced Settings section is an advanced option for developers used for customizing the approval form.
- Enter the description of the step into the Description field.
- Click Save.