After creating the workflows, use them to set up approval processes.
Approval process defines what is to be approved, which workflow is to be used and under which conditions. There are three types of approval processes requiring different setup procedures:
- Status approval – As a result of this approval, the item status is set to Approved.
- Content approval – As a result of this approval, the approved item is copied to the new target list.
- Approval without action – As a result of this approval, no action is performed.
Any of these process types can be simple or conditional.
Set up Status Approval
The status approval process regulates the creation of a new item (record) in the destination list. Technically, in the background, the same SharePoint list is used, in which the Status field is updated to record the approval workflow results.
Follow these steps to set up a status approval process:
- Select or create a SharePoint list for items that would need approval. Make sure that the list has the following fields:
- The Status field to record the approval process results.
- At least one of the following fields: RequestedBy, Employee, Department. This information is used for determining the persons responsible for each workflow step, because the Approver field in a workflow step in most cases specifies a role and not a particular person, so the system needs information from one of those fields to determine the responsible person based on this role.
- Go to Settings > Settings and Configuration > Core HR.
- Click Processes and Approval Workflows in the left panel and click Edit next to the Approval Workflows setting name on the Basic tab.
.png)
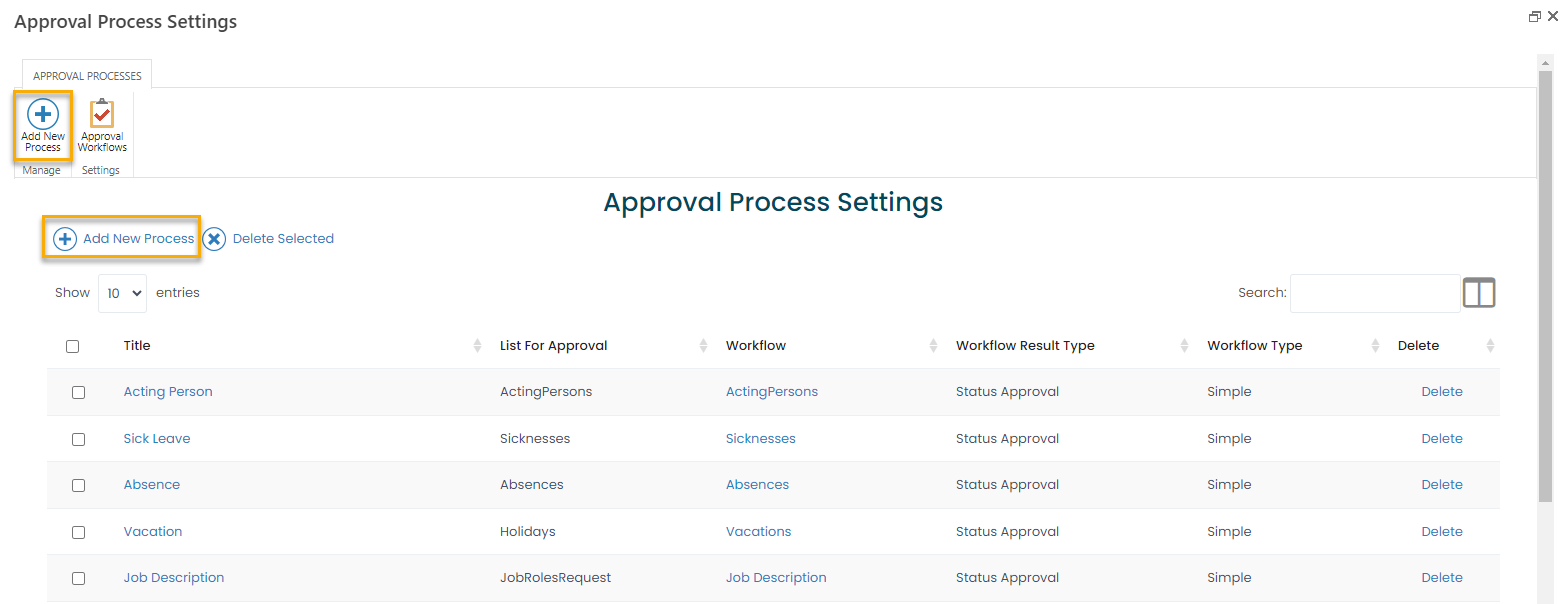
- The Approval Process Settings form will appear.
- Click the Add New Process button on the ribbon or at the top of the form.
- The Approval Process Settings edit form will appear.
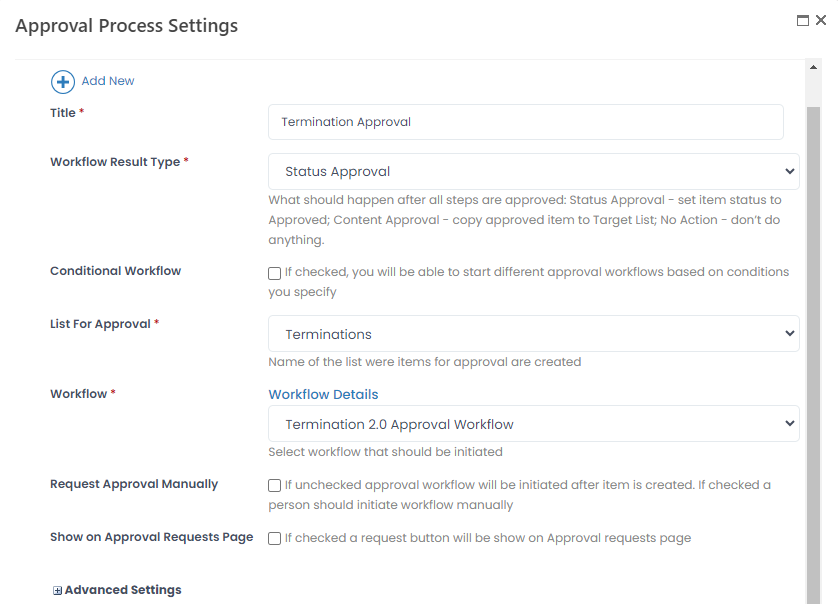
- Specify the name of the approval process in the Title field.
- Select Status Approval in the Workflow Result Type field.
- Use the List for Approval field to select the list where items for approval will be created. NoteIf the selected list is deleted later on, the approval process setting will be deactivated and won't be displayed on the Approval Process Settings page and Approval Requests page.
- Select a workflow for the process in the Workflow field. If currently there is no workflow in the system that fits this approval process requirements, there is an option to create a new workflow by clicking the Add New button at the top of the form.
- Select the Conditional Workflow check box to create a conditional workflow.
- If you plan that the approval requests will be created only with the help of a button in the My Approval Requests page and the workflow will be initiated only after an item is created using this button, select the Request Approval Manually check box. If this box is selected, the initiator will have to launch the workflow manually, which means that he/she will have to go through the following steps:
- Click the corresponding button on the My Details > My Approval Requests page. The workflow will be created in the Draft status.
- Change their role to Employee.
- Go to My Approval Requests > Created by Me.
- Click Approve/Reject for the draft workflow and select Request Approval in the Action field.
- If you want to create a new button for starting this process that will be available on the Approval Requests page for HR role and My Approval Requests page for the Employee role, select the Show on Approval Requests Page check box. For example, if we are setting up a Termination Approval process, a Termination Approval button will be added under Start Approval Process and after the button is clicked, a form for creating a new item in the Terminations list will be displayed.
.png)
- If the Show on Approval Requests Page check box is selected, the Order on Approval Requests Page field becomes available where you can specify the number that defines the order in which the corresponding button on the My Approval Requests page will be arranged in relation to other approval request-related buttons. The lower the number the closer to the lest the button will be arranged where 1 means it'll be the first button, 2 – the second button, 3– the third button, and so on.NoteIf you leave 0 in this field, the button will be arranged after the buttons that have this setting filled in. For several buttons that have this setting set to 0, the arrangement corresponds to the order in which the corresponding approval requests workflow are configured.
- If the Show on Approval Requests Page check box is selected, also the ES Roles field becomes available where you should specify the roles that will be able to create records in the approval list and that will see the corresponding button on their My Approval Requests page.NoteYou can only select the Request Approval Manually check box at the time of creating the approval process. Also, if it is selected, the Show on Approval Requests Page check box must be selected as well.
- The Advanced Settings group allows the developers to change default forms that will be displayed during the approval process. Also, under Advanced settings, you can control automatic approval:
- Select the Disable Automatic Step Approval check box if you don't want to have other process steps the employee is also responsible for to be automatically approved after he/she has approved a process step.
- Select the Disable Automatic Request Approval check box if the step is to remain Pending in case no responsible is found (for example, the employee selected as responsible has been terminated or there is no employee with the responsible job role). If the check box is cleared, the approval step (in multi-step process) or approval request (in one-step process) will be automatically approved if there is no responsible.
- Click the Save button to save the process.
Set up Content Approval
The content approval process regulates the update of an item (record) in the destination list. In this process, normally certain fields in an item (record) in the destination list are updated, however all fields can be updated if necessary. Technically, in the background, two SharePoint lists are used:
- A target list where the records will be created upon approval.
- A temporary list where the approval records will be created and stored until the approval process is finalized. In the temporary list, you add fields, the update of which you want to be managed by this content approval workflow. Additionally, it is mandatory to create the following fields in the temporary list (ensure you use the internal field names):
- Employee with the ES2013 Employee Picker type
- ApprovalStatus with the lookup to the Approval Statuses list
- ApprovalRequest with the lookup to the Approval Requests list
Follow these steps to set up a content approval process:
- Go to Settings > Settings and Configuration > Core HR.
- Click Processes and Approval Workflows in the left panel and click Edit next to the Approval Workflows setting name on the Basic tab.
- The Approval Process Settings form will appear.
- Click the Add New Process button on the ribbon or at the top of the form.
.png)
- The Approval Process Settings edit form will appear.
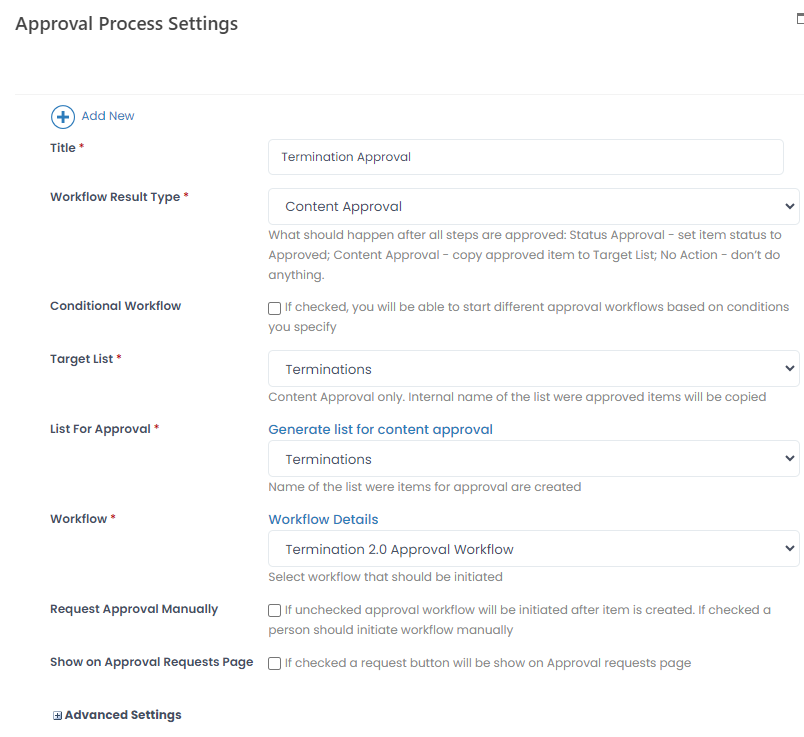
- Specify the name of the approval process in the Title field.
- In the Workflow Result Type field, select Content Approval. NoteContent approval can be set up only for updating current data, and not for historical data. For example, if you select the Employees list, the content approval process will not be able to update the fields from the employment history, or of you select the Salary Details list, the fields from the salary details will not be updated upon content approval. Additionally, if you select either the Employees list or the Salary Details list , note that the employee Full Name (internal name Title) field will not be updated by the content approval process.
- Next, select the target list where the items will be created after the successful approval.
- Now it's time to specify the name of the list where the items will be stored in the process of approval. This list must contain the same fields as the target list plus the following additional fields (the internal names must be specified):
- Employee with the ES2013 Employee Picker type
- ApprovalStatus with the lookup to the Approval Statuses list
- ApprovalRequest with the lookup to the Approval Requests list
- Select a workflow for the process in the Workflow field. If currently there is no workflow in the system that fits this approval process requirements, there is an option to create a new workflow by clicking the Add New button at the top of the form.
- If you want different workflows to be used depending on the approval request details, select the Conditional Workflow check box and set up the conditions based on which different workflows will be triggered.
- Select Request Approval Manually if the workflow is to be initiated only with the button on the My Approval Requests page and is to be launched manually.
- If you want to create a new button for starting this process that will be available on the Approval Requests page for HR role and My Approval Requests page for Employee role, select the Show on Approval Requests Page check box. For example, if we are setting up a Termination Approval process, a Termination Approval button will be added under Start Approval Process and after the button is clicked, a form for creating a new item in temporary list will appear.
- If the Show on Approval Requests Page check box is selected, the Order on Approval Requests Page field becomes available where you can specify the number that defines the order in which the corresponding button on the My Approval Requests page will be arranged in relation to other approval request-related buttons. The lower the number the closer to the lest the button will be arranged where 1 means it'll be the first button, 2 – the second button, 3– the third button, and so on.NoteIf you leave 0 in this field, the button will be arranged after the buttons that have this setting filled in. For several buttons that have this setting set to 0, the arrangement corresponds to the order in which the corresponding approval requests workflow are configured.
- If the Show on Approval Requests Page check box is selected, also the ES Roles field becomes available where you should specify the roles that will be able to create records in the approval list and that will see the corresponding button on their My Approval Requests page.NoteYou can only select the Request Approval Manually check box at the time of creating the approval process. Also, if it is selected, the Show on Approval Requests Page check box must be selected as well.
- The Advanced settings group allows the developers to change default forms that will be displayed during the approval process. Also, under Advanced settings, you can control automatic approval:
- Select the Disable Automatic Step Approval check box if you don't want to have other process steps the employee is also responsible for to be automatically approved after he/she has approved a process step.
- Select the Disable Automatic Request Approval check box if the request is to remain Pending in case no responsible is found (for example, the employee selected as responsible has been terminated or there is no employee with the responsible job role). If the check box is cleared, the approval step (in multi-step process) or approval request (in one-step process) will be automatically approved if there is no responsible.
- Click the Save button to save the process.
Set up Approval Without Action
The approval without action is similar to the status approval, but in this case no action is performed after approval. This type of approval may be required for some custom approval process, where the workflow logic doesn't require changing the item status or copying the item content to another list.
Set up this approval type in a similar way to how you set up the status approval. In the Workflow Result Type field, select No Action.
Conditional Workflows
You can have different workflows triggered depending on the approval request details. For example, if the requested number of vacation days is up to 5, it is approved by the direct manager only, and if it exceeds 5 days, it is additionally approved by the org unit manager. Select the Conditional Workflow check box to be able to specify conditions for launching the workflows (the Workflow Type will be set to Conditional in this case, otherwise, it will be Simple).
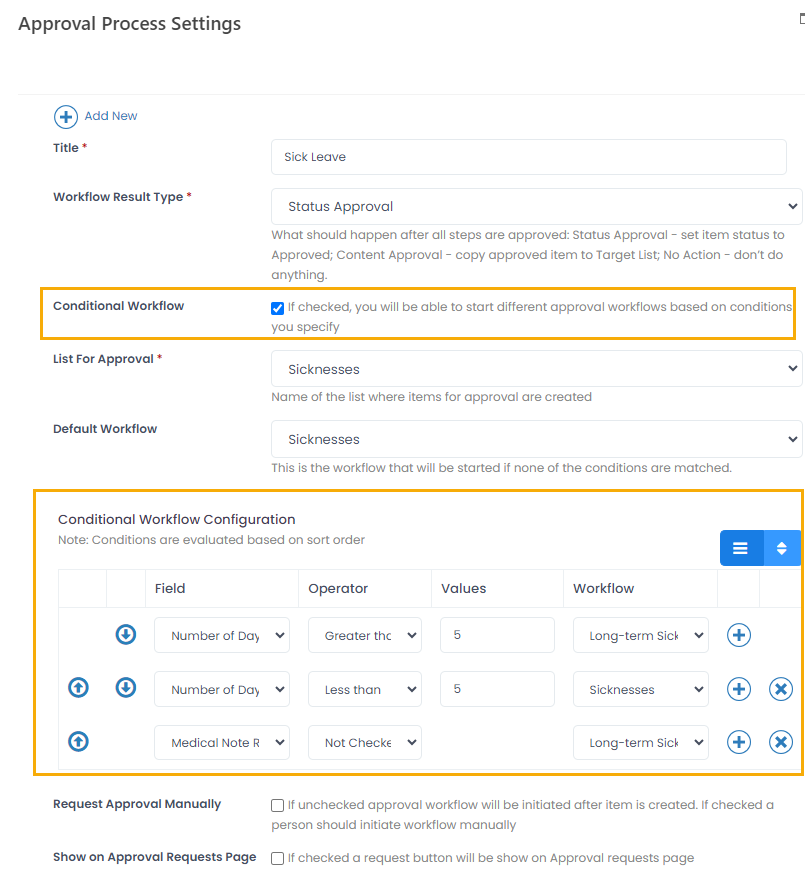
The Workflow field where you specify a single workflow for the process will be hidden and the Conditional Workflow Configuration section will display. Use it to set up conditions based on which different workflows will be triggered. The condition can be based on one of the following field types - choice, numeric, calculated, yes/no or currency and correspondingly, the List for Approval field must contain a list with at least one such field. The following operators can be used for condition setup:
- Equals - Checks if two values are the same. Used for the choice, numeric and currency fields. Can be used for calculated fields that return numeric or currency values.
- Not equals - Checks if two values are not the same. Used for the choice, numeric and currency fields. Can be used for calculated fields that return numeric or currency values.
- Less than - Checks if one value is less than another. Used for numeric and currency fields. Can be used for calculated fields that return numeric or currency values.
- Greater than - Checks if one value is larger than another. Used for numeric and currency fields. Can be used for calculated fields that return numeric or currency values.
- Greater than or equals - Checks if one value is larger than or equals to another. Used for numeric and currency fields. Can be used for calculated fields that return numeric or currency values.
- Less than or equals - Checks if one value is less than or equals to another. Used for numeric and currency fields. Can be used for calculated fields that return numeric or currency values.
- Checked - Checks if the check box is selected. Used for the yes/no fields. Can be used for calculated fields that return yes/no values.
- Not checked - Checks if the check box is cleared. Used for the yes/no fields. Can be used for calculated fields that return yes/no values.
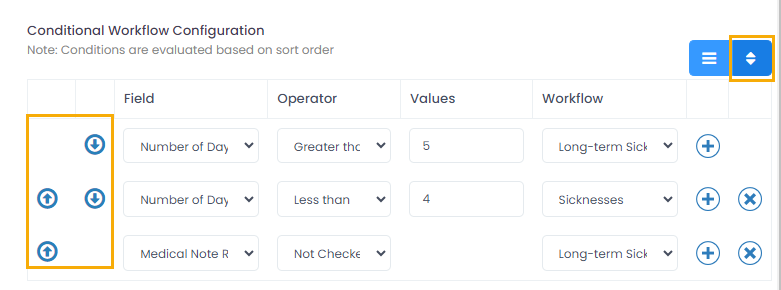
Use the Add button to create conditions for the workflow initiation. You can create conditions based on different fields (for example, some conditions can be based on the sickness Number of Days field and others - in the Medical Note Received field).When adding condition based on numeric, currency or calculated numeric/currency field, you can select an operator and type in a value; for the choice fields, select an operator and select a value; for the yes/no fields and calculated yes/no fields, only the Checked and Not checked operators are available and you choose an operator only, the Value field will be disabled.
When an approval request is created, to define the workflow to be triggered, the conditions are processed (checked) in the same order as they are on the Approval Process Settings page. Workflow for the first found true condition is executed. Change the condition order using drag and drop or up and down buttons, depending on the selected sorting mode.
Drag and drop
.png)
Up and down