Follow these steps to set up the Candidate Self-Service daily backup:
- Make sure that the SharePoint server has network access to the SQL Server Backup folder (Everyone: Read/Write) to store the Candidate Self-Service backups along with the database backups.
- Save the following script to the Backup folder of AD-SQL Server. The folder path must be defined in the script.
$backupFolder = "\\contoso-sql\BACKUP\"
$temppath = "C:\Temp\Temp\"
$currentTime = Get-Date -format "HH:mm:ss"
Write-Host "Start: $currentTime" -foregroundcolor "Green"
asnp *sh*
$sites=Get-Website
if (!(Test-Path $backupFolder)){mkdir $backupFolder > $null}
foreach ($site in $sites){
if (Test-Path ($site.physicalPath.ToString()+"\Lanteria.ApplicantSelfService.WebApi.exe")){
$sourceFolder = $site.physicalPath.ToString()
$destinationArchive = $backupFolder+$site.Name.ToString()+".zip"
New-Item -ItemType Directory -Force -Path $temppath
Get-ChildItem -Path $sourceFolder | Copy-Item -Destination $temppath -Recurse
Compress-Archive -Path (Get-ChildItem -Path $temppath).FullName -DestinationPath $destinationArchive -Force
Remove-Item -Path $temppath -Force -Recurse
start-sleep -s 5
}
if (Test-Path ($site.physicalPath.ToString()+"\Lanteria.ApplicantSelfService.App.exe")){
$sourceFolder = $site.physicalPath.ToString()
$destinationArchive = $backupFolder+$site.Name.ToString()+".zip"
New-Item -ItemType Directory -Force -Path $temppath
Get-ChildItem -Path $sourceFolder | Copy-Item -Destination $temppath -Recurse
Compress-Archive -Path (Get-ChildItem -Path $temppath).FullName -DestinationPath $destinationArchive -Force
Remove-Item -Path $temppath -Force -Recurse
start-sleep -s 5
}
}
- Next, in the Task Scheduler, create a task and name it CaSS Backup.
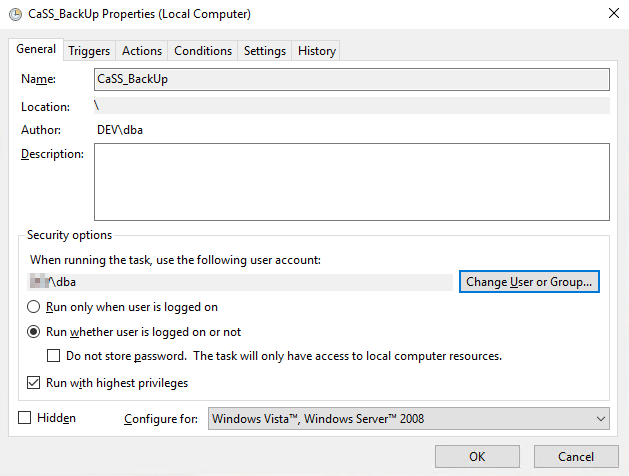
- On the General tab, select the Run whether user is logged on or not option.
- Select the Run with highest privileges check box.
- On the Triggers tab, click New and create a Daily trigger. Set the recurrence to every 1 day, specify the date and time for the task to be started and select the Enabled check box.
.png)
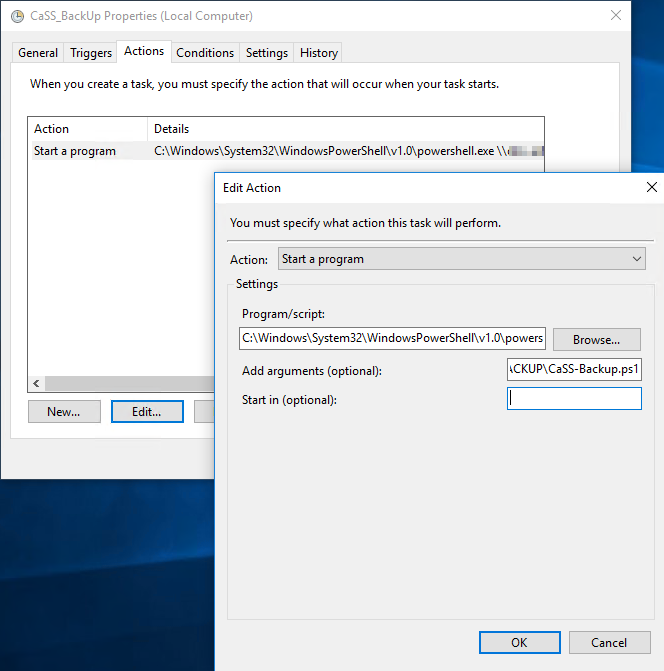
- On the Actions tab, click Edit for Start a program and specify the following path to the PowerShell script: C:\Windows\System32\WindowsPowerShell\v1.0\powershell.exeNoteThe script is in the network folder of the AS+SQL server.
- Click OK to save the task.