Classroom training events can be scheduled from:
- the Learning Catalog (Learning > Learning Catalog)
- the Training Schedule (Learning > Training Schedule).
When scheduling a training from catalog, you are to choose one of the learning materials as a basis for the training event. From the Training Schedule, you can also create training events that are not based on any learning material.
Schedule Classroom Training from Catalog
Follow these steps to schedule a training event from the catalog:
- Go to Learning > Learning Catalog.
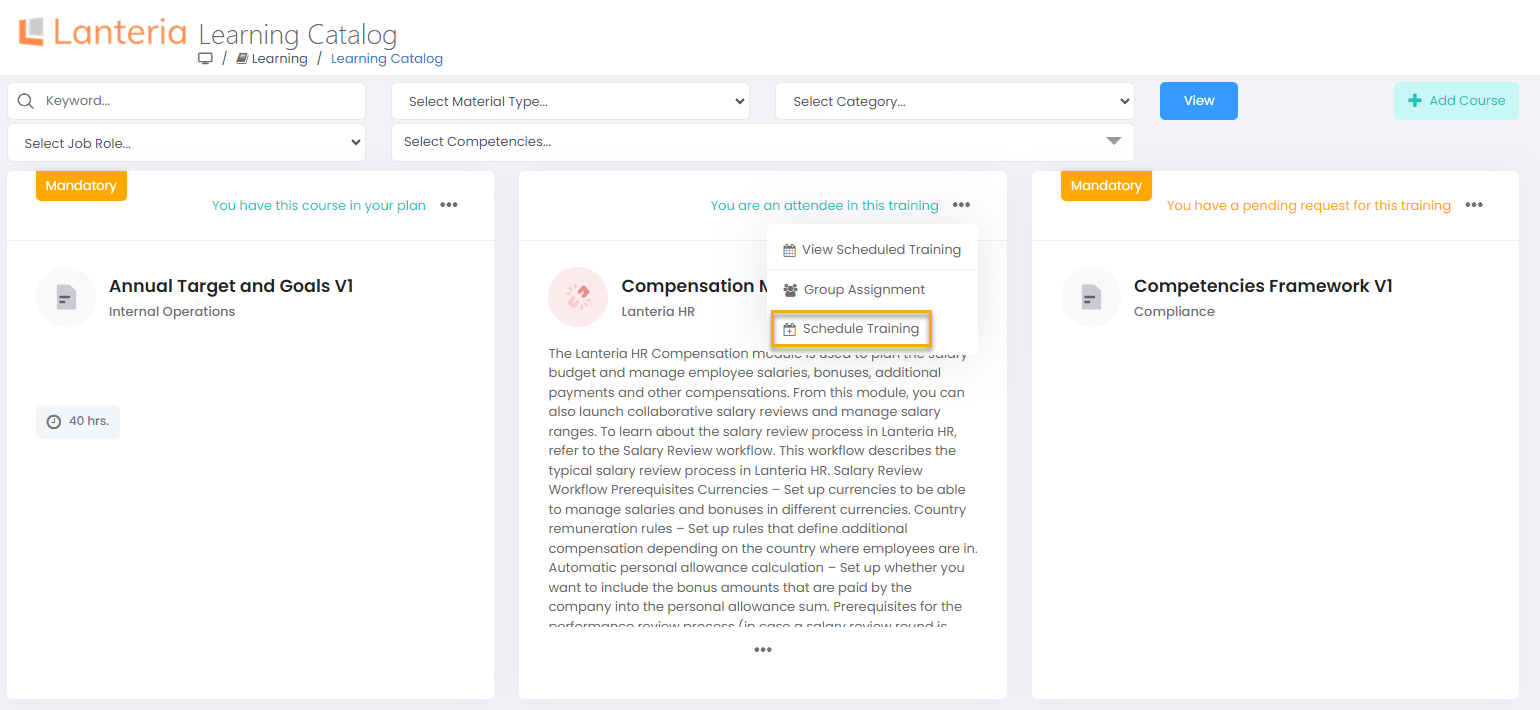
- Select the training and select Schedule Training from the ellipsis (
 ) menu.NoteThis option will be available for the learning materials that have the Event Required check box selected in the learning material properties.
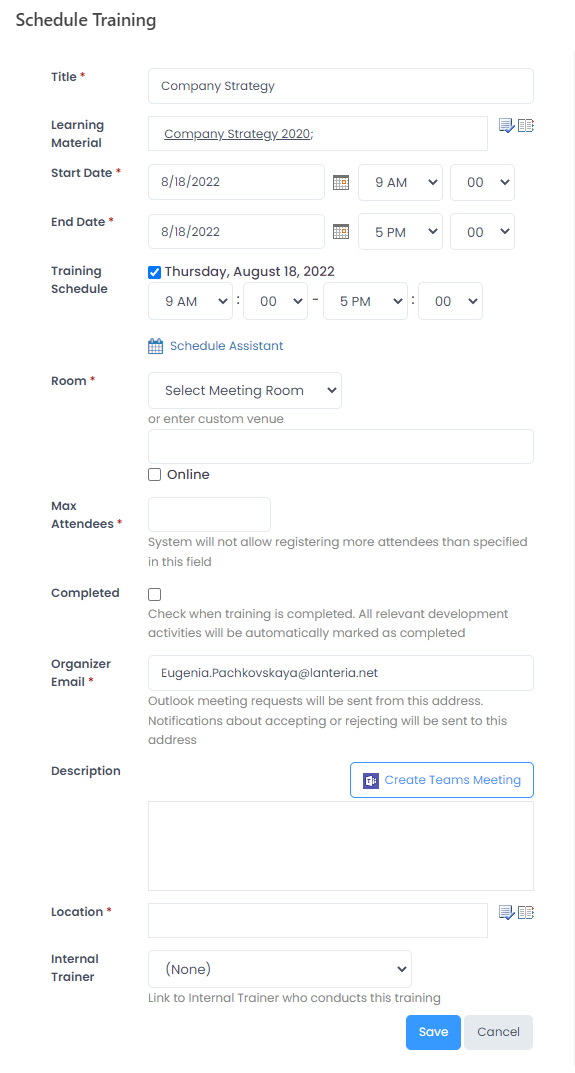
- Edit the training event title in the Title field, if necessary.
- The Learning Material field will be filled in with the name of the material the training event is being created from.
- Specify the training event start date and time in the Start Date field.
- Specify the training event end date and time in the End Date field.NoteIn case of multi-day sessions, specify the start time for most of the training days in the Start Date field and end time in the End Date field. If the timing for some days will be different, this can be set up under Training Schedule below.
- For the training events that last for several days, under Training Schedule, you can set up exact timing for each day of training. Also, if the training will not be conducted on some days, you can mark it by clearing the check boxes next to these days.
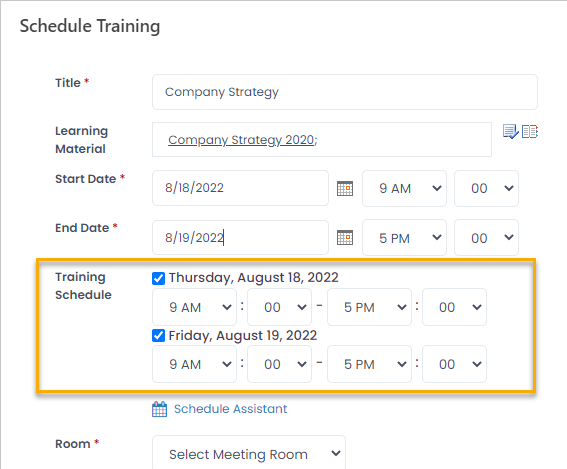 According to the dates and timings set up, the training will be displayed in the Training Schedule (Learning > Training Schedule) and appointments will be sent to the attendees.
 - In the Room section, specify the meeting place. If the Exchange Integration and the meeting rooms are set up, select a meeting room the training will be conducted in. To check the meeting room availability, click Schedule Assistant after selecting the room. After saving the training event, the meeting room will be booked through Outlook.
If there are any appointments with Show as set to Free, they will be marked with a corresponding label on the Scheduling Assistant page and will be formatted with a different color. The room can be booked for the time of such appointments.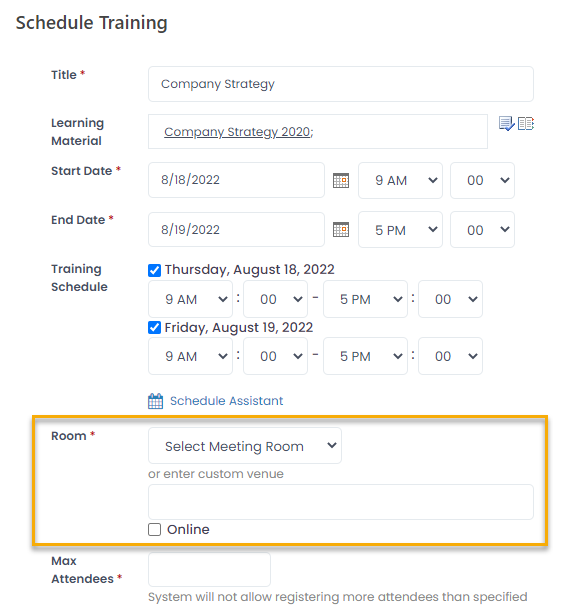
If the training will be conducted in the online format, select the Online check box. This being done, the room selection options will be unavailable. For the online training events, you can generate the Microsoft Teams meeting using the Create Teams Meeting button. - Specify the maximum number of attendees that can participate in the training in the Max Attendees field. It will not be possible to register more attendees than specified in this field. When registering for a training event, the remaining number of attendees will be displayed.
- Select the Completed check box if the training being created is to be marked as completed.
- Enter the organizer's e-mail into the Organizer Email field. The MS Outlook meeting invitations will be sent from this address. Notifications about accepting or rejecting the invitations will be sent to this address. The organizer also receives an email notification when the training event is created or cancelled.
- Optionally, you can create a Microsoft Teams meeting for the training. Click Create Teams Meeting. Sign in to your Microsoft account. The meeting scheduling details will be displayed and next, the meeting link will be generated and copied to the Description field.
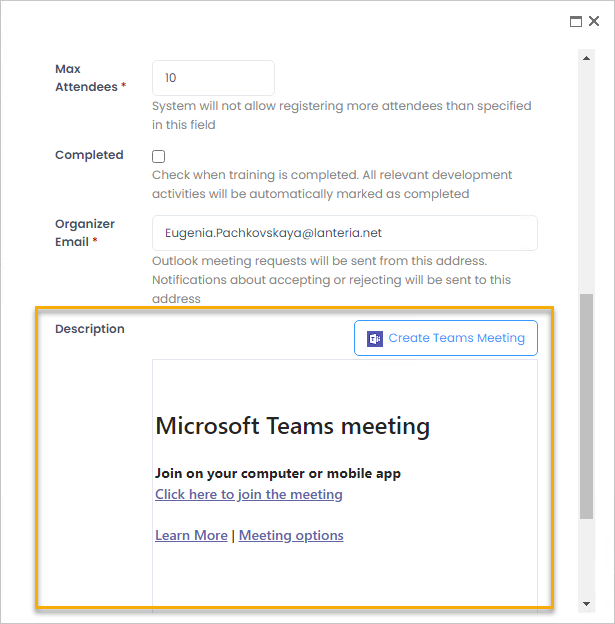
All the meeting participants will receive this link in the e-mail.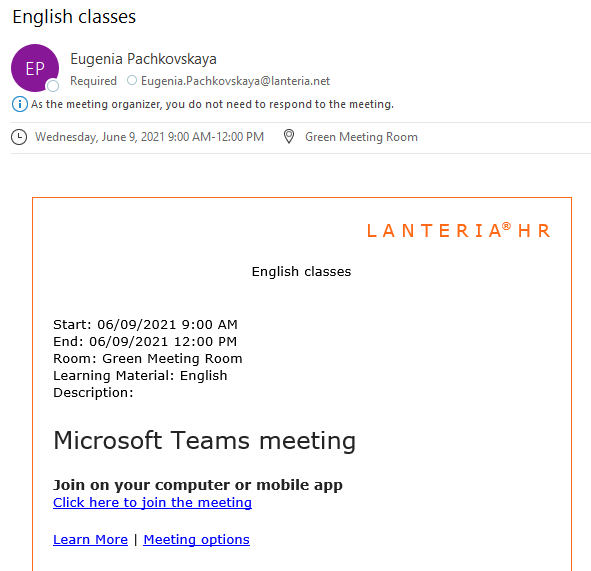
- If you are not scheduling the Microsoft Teams meeting or want to add some training event description that will be visible to the participants, enter it into the Description field.
- Select the training event location from the drop-down list in the Location field.
- Select the trainer who will conduct the event from the drop-down list in the Internal Trainer field. If the Exchange Integration is set up, click the Schedule Assistant button to view the internal trainers schedule. The Scheduling Assistant will open displaying data from the trainers' Outlook calendars. If you click Scheduling Assistant before selecting the trainer, you'll see schedules of all the trainers. Otherwise, only the schedule of the selected trainer will be displayed. Double-click the available time slot and click OK to update the training time accordingly.NoteThe list of internal trainers is a part of the classroom trainings setup.
Additionally, to check availability of a trainer, this trainer must have an email specified on the employee card or in the employee's AD account; otherwise, an error message will appear and availability of such a trainer will not be displayed.
If a trainer has an appointment with Show as set to Free, it will be displayed with a corresponding label and in different color. The trainer is considered as available in such cases. - Click Save.
Schedule Classroom Training from Training Schedule
To schedule a training event from the Training Schedule page, go to Learning > Training Schedule and click the Schedule Training button.
The training scheduling form that opens is the same as the one opened from the Learning Catalog. The only difference is that the Learning Material field will be blank. You can either select a learning material from the catalog or leave it blank.
Copying a training
Alternatively, you can create a copy of an existing scheduled training by clicking on the training to open its details, and then clicking Copy from the three dots menu. Make the required changes and then click Save. This is useful when you need to schedule a similar training with minor changes. 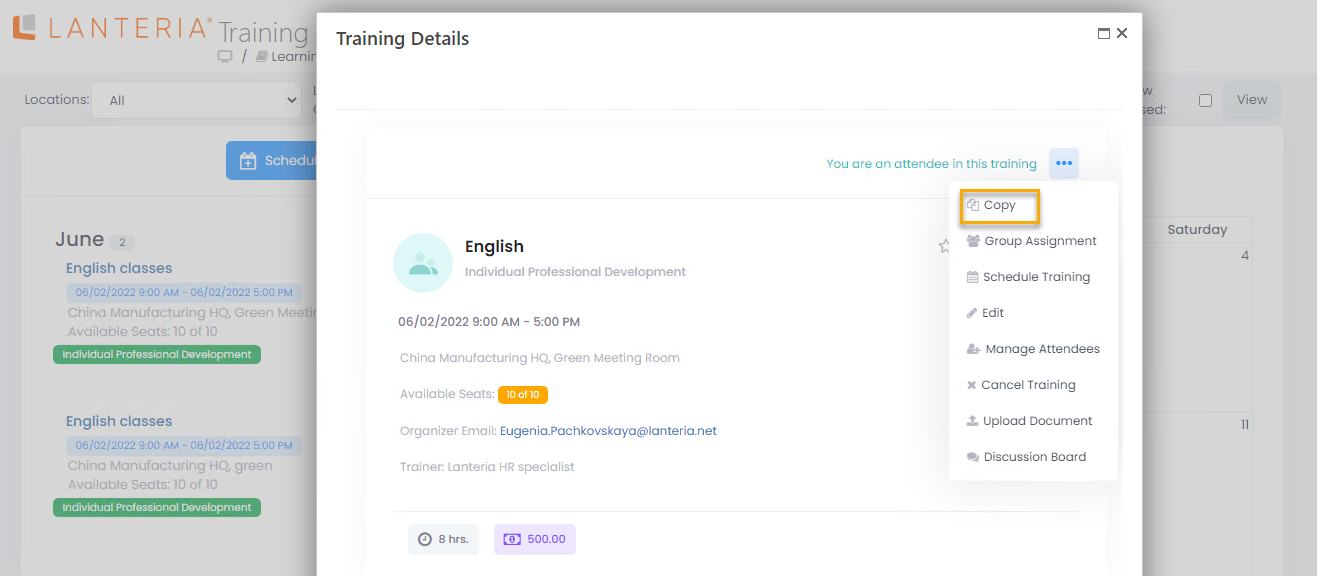
Managing a scheduled training
Depending on the employee's permissions, other actions available from the training details page, which can be opened by clicking the training event in the training schedule, can be:
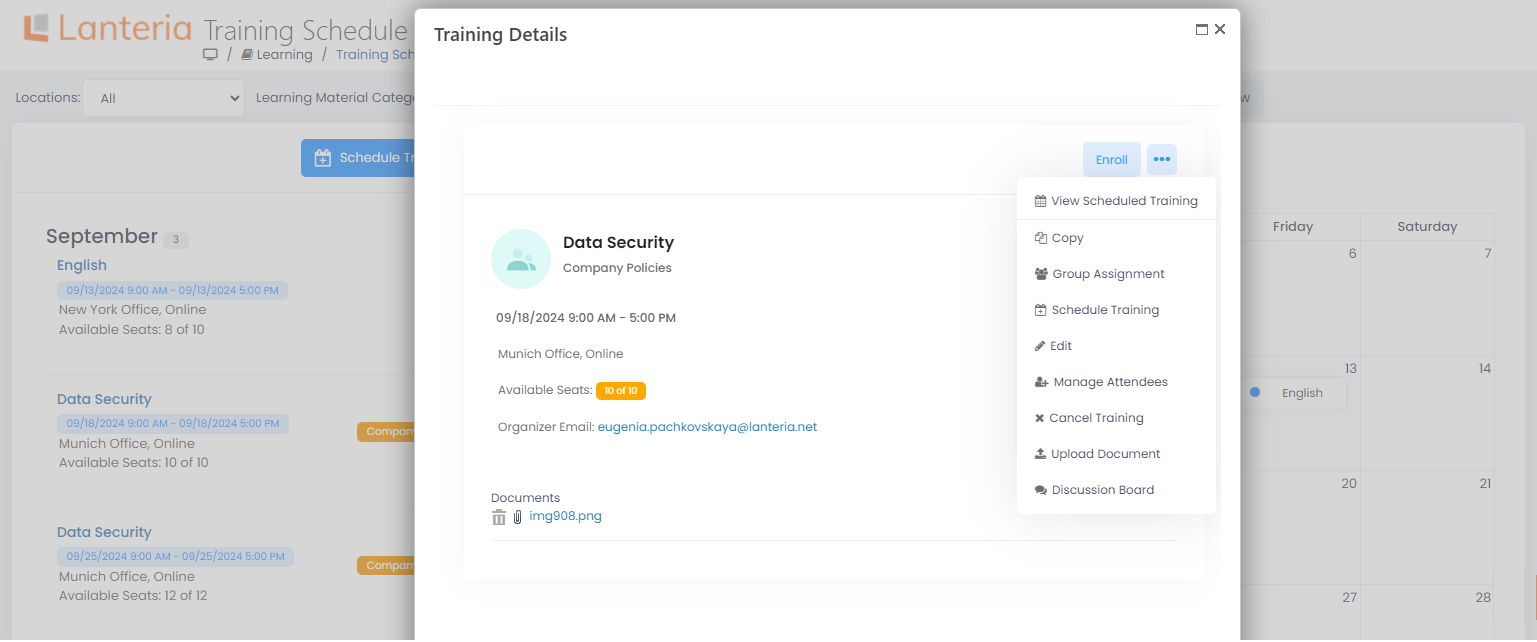
- View Scheduled Training, to open Training Schedule and view all the events scheduled for the current learning material.
- Copy, to create a copy of the training.
- Group Assignment, to assign the training to a group of people at once.
- Schedule Training, to create a new event for this training activity in the Training Calendar.
- Edit, to edit the details of the current training event.
- Manage Attendees, to edit the attendees list and add documents to training event.
- Cancel Training, to cancel the event
- Upload Document, to upload a document, related to the learning material (will be available for all the training events based on this learning material).
- Discussion board, to open the discussion board where participants can discuss any topics, related to the training. NotePlease note that the View Scheduled Training, Group Assignment, Schedule Training and Upload Document buttons are available only for training that is based on a learning material.