Designing performance review forms is done in two steps: creating a review form template and adding sections to it. You can use different section types and you can preview the performance review form.
Follow these steps to create a performance review form template.
- Go to Settings > Settings and Configuration > Performance.
- Click Performance Reviews in the left panel and click Edit next to the Performance Review Form Designer setting name on the Basic tab.

- The list of templates will open.
.png)
- Click the Add New Template button.
- In the form that opens, provide the template title.
.png)
- Select the Include Previous Competency Assessment check box if you want the Competency Assessment section of the generated performance review form to display the results of the competency assessment of the previous review. If the assessed employee was assessed during the previous competency assessment, the previous assessment will be displayed as Previous Competency Assessment.
.png)
- Select the Hide Section Numbers check box if the sections of the generated review form should be displayed without numbers before the section name.
- Use the Display Review Form Sections field to define how the sections in the performance review form are to be displayed:
- All at Once - all the sections included into the review form template will be displayed on one page. The user can navigate between the sections using the left pane of the review form.
.png)
- One by One - only the selected section will be displayed in the review form page. Navigate between the sections using the left pane of the review form or the Next Section and Previous Section buttons.
.png)
- All at Once - all the sections included into the review form template will be displayed on one page. The user can navigate between the sections using the left pane of the review form.
- Select the Weighted Sections check box if you want to assign weight to the sections that participate in calculating the Calculated Score. For more details, refer to the Weighted Sections for Calculated Score topic.
- Click Save.
The newly created template will appear in the list. Click the template name to view the template details.
Add Sections to the Template
Click Actions > Design Form next to the newly created template name to add sections to the performance review form.
.png)
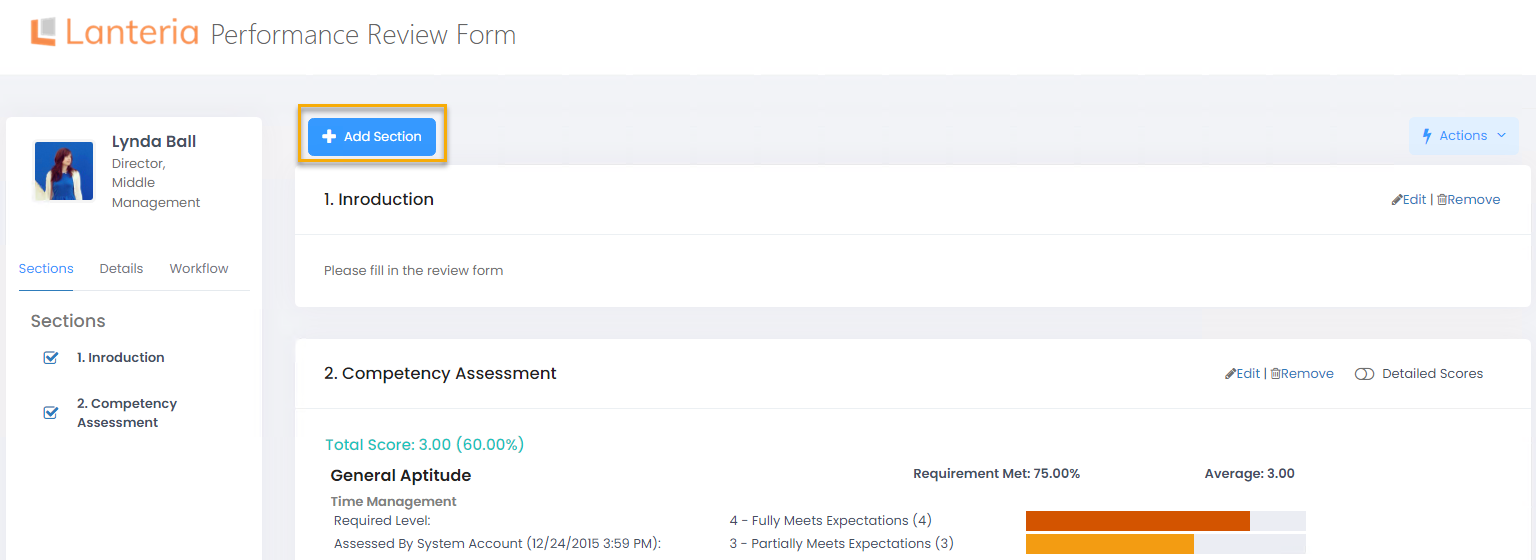
Initially the form template is blank. When sections are added the form looks the same as it will appear to the users.

There are three tabs to the left of the page where you can view the review sections, review details and the review workflow.
.png)
Use the Add Section button to add sections. The new sections will be displayed in the form immediately after they are added. There are different section types for different purposes described below.
Section Types
You can add sections with predefined content and look, for example employee objectives, competencies and so on, or custom sections with manually created fields. There are the following section types:
- Objectives – when generating the review forms for individual employees, the system will include the Objectives section and copy all the active employee personal goals along with their current statuses into the form. This way, if the employee is updating the goal statuses on the ongoing basis, he or she will get a filled in and fully ready Objectives section in the form
- Objectives Plan - the system will include the Objectives section and copy all the future employee personal objectives along with their current statuses into the form
- KPIs – the KPIs section will be added to the review form along with the KPIs currently assigned to the employee and their statuses
- Competencies – the section with competencies currently assigned to the employee will be added to the form. The ongoing manager’s assessment will be copied as well if the manager has assessed the employee in the Manager role menu under My Team Competencies
- Job Responsibilities – job responsibilities from the job profile (Performance > Competence > Job Profiles) will be copied to the form
- Development Needs – development needs falling within the review period that are available to the employee will be added to the form (Employee role menu, My Development Needs)
- Development Needs Plan - the future development needs currently available to the employee will be added to the form
- Career Goals – the section with employee career goals will be added to the review form (Employee role menu, My Career Goals)
- Custom Fields – a section with custom fields will be included into the form. This section type does not include any predefined content and requires creating field groups, fields and field choices for the section
- Custom List – a section will include a custom list. The list should be previously created using standard SharePoint functionality and include a PerformanceReview field of the lookup type
- Performance Rating – a section for evaluating the employee by the performance rating will be added to the form.
- Review Data – a section with custom fields will be included into the form. This section type also doesn’t include any predefined content and requires identification of fields the section will consist of
- Header – a section that can be used to display some general information on the performance review. Use the Header CSS Class field to specify the style to be used for the header
Add a Section with Predefined Content
Follow these steps to add a section with predefined content to the review form template:
- Click the Add Section button in the Design Form form.
- Enter the name of the section as it will display in the review form into the Title field.

- Select the new section type from the drop-down list in the Section Type field. All section types except Custom Fields, Custom List, Review Data and Header are predefined-content section types.
- In the Filled By column, specify which roles will be able to fill in this section. The section will be editable only for the role(s) you select.
- Employee - Select this check box to enable users in the Employee role to edit this section. This check box must also be selected for the sections that you want to be editable for the Employee role to be able to assign a performance review workflow step to this role (the Assigned To field when add a performance review workflow step).
- Manager – Select this check box to enable users in the Manager, Second Level Manager, Additional Manager, or Org Unit Manager role to edit this section. This check box must also be selected for the sections that you want to be editable by these roles to be able to assign a performance review workflow step to one of these roles (the Assigned To field when add a performance review workflow step).
- HR – Select this check box to enable users in the HR role to edit this section. This check box must also be selected for the sections that you want to be editable for the HR role to be able to assign a performance review workflow step to this role (the Assigned To field when add a performance review workflow step).
- Use the Employee, Manager, and HR check boxes in the Hide From column to specify the roles from which the section should be hidden. For the selected roles here, this section will also be unavailable for selection when the employee in this role decides to print out the performance review form.
- Use the Section Order field to define the order of this section in the form relative to other sections included into the template.
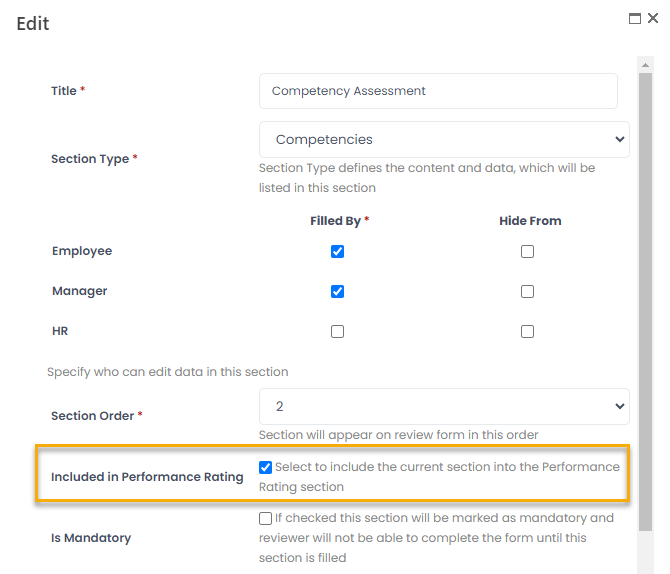
- Select the Included in Performance Rating check box if you wish to include this section into the performance rating calculation.
- If the Included in Performance Rating check box is selected, specify the relative weight of this section scores in relation to other sections included into the performance rating calculation in the Score Weight field.NoteThe Score Weight field will be visible after you set the Section Type to either Competencies, Objectives, KPIs, or Job Responsibilities, only if the Weighted Sections check box was selected when creating the performance review form template.
- Select the Is Mandatory check box to make the section mandatory for filling. In this case, the performance review form cannot be submitted until this section is filled in.
- If the section is to be hidden from the form after the performance review is completed, select the Hide on Completed Form check box.
- In the Description field, type the description that will be displayed under the section name in the review form.
- Additional developer options are available in the Advanced Settings section. Skip them during user setup.
- Click Save.
Add Custom List
You can add a custom section, based on a custom SharePoint list, to the performance review form. To add such a section, a custom list must be created first. It is mandatory that a custom list created for a performance review form includes two lookup fields: one field that gets information from the Title field in Performance Review and another field that gets information from the Full Name field in Employees.
Follow these steps to add a Custom List section to a Performance Review form:
- Create a custom list that the performance review section will be based on. When creating a custom list, you can add fields with various information types. The basic information types that you can use for fields in your custom list are the following:
| Field Information Type | Description |
| Single line of text | Can be used to add a text field. The field value can contain up to 255 characters. |
| Multiple lines of text | Can be used to add a text field that can contain more text as well as other elements. You can choose to add plain or rich text with pictures, tables, etc. |
| Choice | Can be used to add an option field. You can add as many choices as needed and display them in a drop-down menu, as radio buttons, check boxes, etc. |
| Number | Can be used to add a field where the user can enter a number. You can specify the minimum and maximum values, and choose to display it in percentage if necessary. By selecting Calculated Value, you can add a formula in the SP format and the system will perform automatic calculations for this field (note that this is an advanced option; possible formulas can be found in the SP tutorials). |
| Currency | Can be used to add a field where a currency can be specified. |
| Date and Time | Can be used to add a date field. |
| Lookup | Can be used to add a field that will be connected with the fields in another list. using this property, you can add a few non-lookup fields from one list. |
| Yes/No | Can be used to add a check box. |
Ensure that the following fields are included into your custom list for the performance review section:
- A field of the lookup type with the reference to Title field in Performance Review. For example, the Performance Review field.

- A field of the lookup type with a reference to the Full Name field in Employees. For example, the Employee field. This name will be automatically filled in with the employee's name.
.png)
- In the Performance Review Form Designer, click Actions > Design Form next to the performance review form to which you want to add a custom section, and then click Add Section.
- In the Title field, type the name of the custom section. This name will be displayed on the review form.
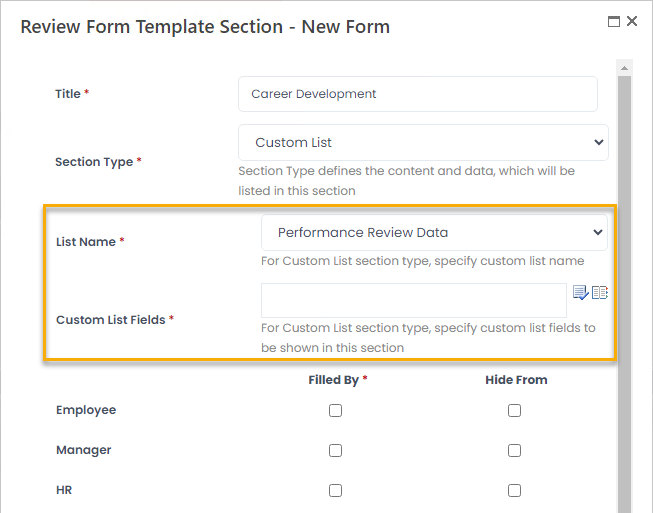
- In the Section Type field, select Custom List. A new field, List Name, becomes available.
.png)
- In the List Name field, select the custom list that was created for this performance review form. Another field called Custom List Fields becomes available.
- In the Custom List Fields field, select the fields to be displayed on the performance review form. Ensure that you select at least two mandatory fields.
- Fill in the Filled By, Hide From, Description, and Section Order fields.
- Click Save.
In the performance review form, the section of the list type will be displayed as a table with editable records. You can add records using the Add button.
Add Review Data
The Review Data section is used to include custom fields in the performance review form. Please note that you can add only fields from the Performance Review Data list; you can customize it to add custom review data fields if needed.
Follow these steps to add a Review Data section to the review form:
- If necessary, customize the predefined Performance Review Data list to add new custom fields if you want them to be available for selection for your Review Data section:
- Click Settings > Site Lists and Libraries.
- Locate the Performance Review Data list and double-click it.
- On the LIST tab and click List Settings.
- Click Create column to create a new column.
- In the Column name field, type the column name.
- Specify the type of information in the column and other properties, and then click OK.
- Add more custom columns if necessary.
The basic information types that you can use for fields in your Review Data list are the following:
| Field Information Type | Description |
| Single line of text | Can be used to add a text field. The field value can contain up to 255 characters. |
| Multiple lines of text | Can be used to add a text field that can contain more text as well as other elements. You can choose to add plain or rich text with pictures, tables, etc. |
| Choice | Can be used to add an option field. You can add as many choices as needed and display them in a drop-down menu, as radio buttons, check boxes, etc. |
| Number | Can be used to add a field where the user can enter a number. You can specify the minimum and maximum values, and choose to display it in percentage if necessary. By selecting Calculated Value, you can add a formula in the SP format and the system will perform automatic calculations for this field (note that this is an advanced option; possible formulas can be found in the SP tutorials). |
| Currency | Can be used to add a field where a currency can be specified. |
| Date and Time | Can be used to add a date field. |
| Lookup | Can be used to add a field that will be connected with the fields in another list. using this property, you can add a few non-lookup fields from one list. |
| Yes/No | Can be used to add a check box. |
- In the Performance Review Form Designer, click Actions > Design Form next to the performance review form, to which you want to add review data, and then click Add Section.
- In the Title field, type a name of the custom section. This name will be displayed on the review form.
- In the Section Type field, select Review Data. The new fields specific for this section type will display.
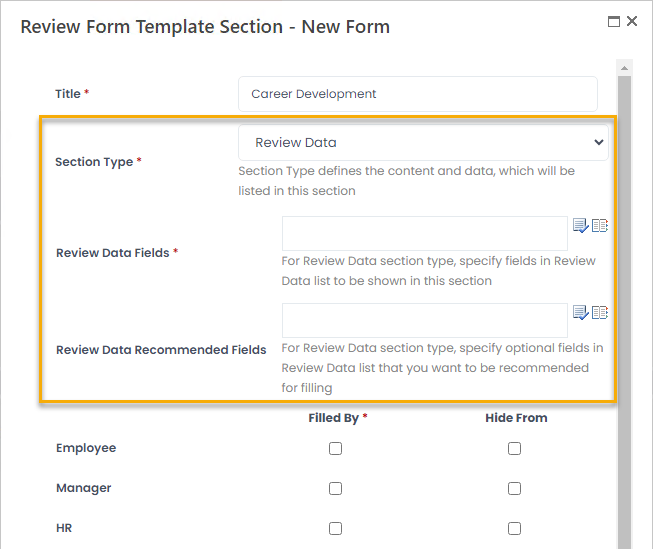
- Use the Review Data Fields field to select the fields from the Performance Review Data list that will be included into the section you create. The order of fields in the section will be the same as the order in which you add the fields.
- In the Review Data Recommended Fields field, specify which of the selected fields will be marked as recommended for filling in.
- Fill in the Filled By, Hide From, Description, and Section Order fields.
- Click Save.
Add Performance Rating
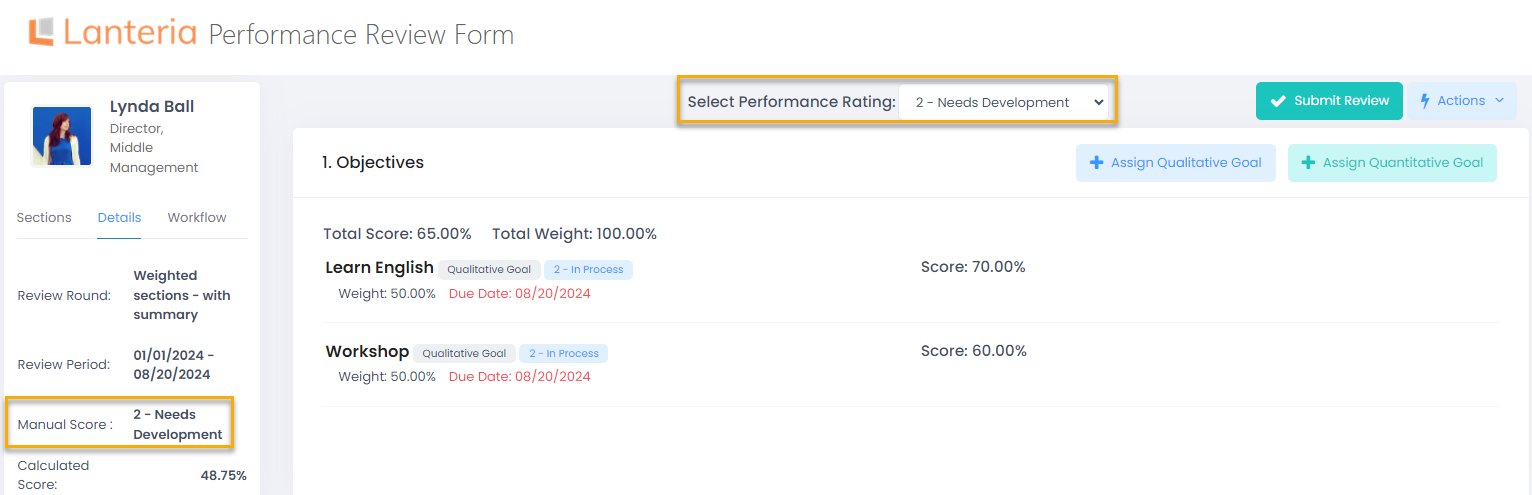
The Performance Rating section allows providing general ratings for the selected sections.

The average performance rating for all the selected sections is displayed in the Select Performance Rating field at the top of the form. The system calculates the average rating and displays it to the user. The user can change it to any other score. The Manual Score in the information block will be updated after the form is submitted.
To set up the Performance Rating section, the following three steps must be performed:
- A section of the Performance Rating type is to be added to the review form template
- Performance ratings to select from are configured under Settings > Settings and Configuration > Performance > Performance Reviews > Performance Ratings.
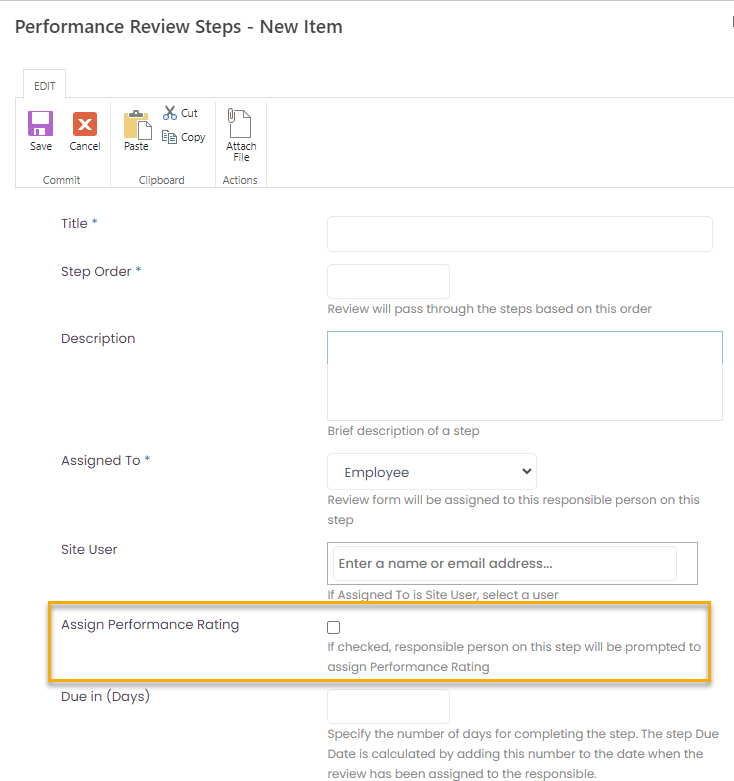
- In the performance review workflow, the Assign Performance Rating check box must be selected for the steps during which the assessment is to be performed (Settings > Settings and Configuration > Performance > Performance Reviews > Performance Review Workflows; click the workflow name and then Add New Step or the existing step name to start editing it). Editing the Performance Rating section and the manual score will be possible only on the steps with the Assign Performance Rating check box selected.
- Sections to be included into the Performance Rating section are to be selected. Any sections that comprise the review form template (Competencies, Objectives, Career Goals and so on) can be included into the performance rating evaluation. To achieve this, select the Included in Performance Rating check box.
 Auto-assign Performance Rating Based on the Calculated ScoreStarting from version 26.2.1, the system can automatically assign the Performance Rating based on the Calculated Score and Rating Matrix.
A new option is available at Settings > Settings and Configuration > Performance > Performance Reviews > Auto-assign Performance Rating Based on the Calculated Score
If enabled, the Score Rating Matrix option appears, allowing the mapping of Minimal and Maximum scores to Performance Review Summary Ratings.
When this option is enabled, only HR users can change the Performance Rating on the review form, and for other roles, it will be greyed out.
Preview Performance Review Form
After adding the sections to the performance review template, you can preview the review form that will be generated during the performance review round. To do this, click the template name in the Review Form Designer and then click Preview Form.
.png)
Copy Performance Review Form
When you need to set up many performance review forms with minimal variations, it may be easier to use an existing performance review form as a basis for new performance review forms. You can do this by copying an existing performance review form, and then changing its design instead of creating a new one from scratch.
To copy a performance review form:
- Go to Settings > Settings and Configuration > Performance.
- Click Performance Reviews in the left panel and click Edit next to the Performance Review Form Designer setting name on the Basic tab.
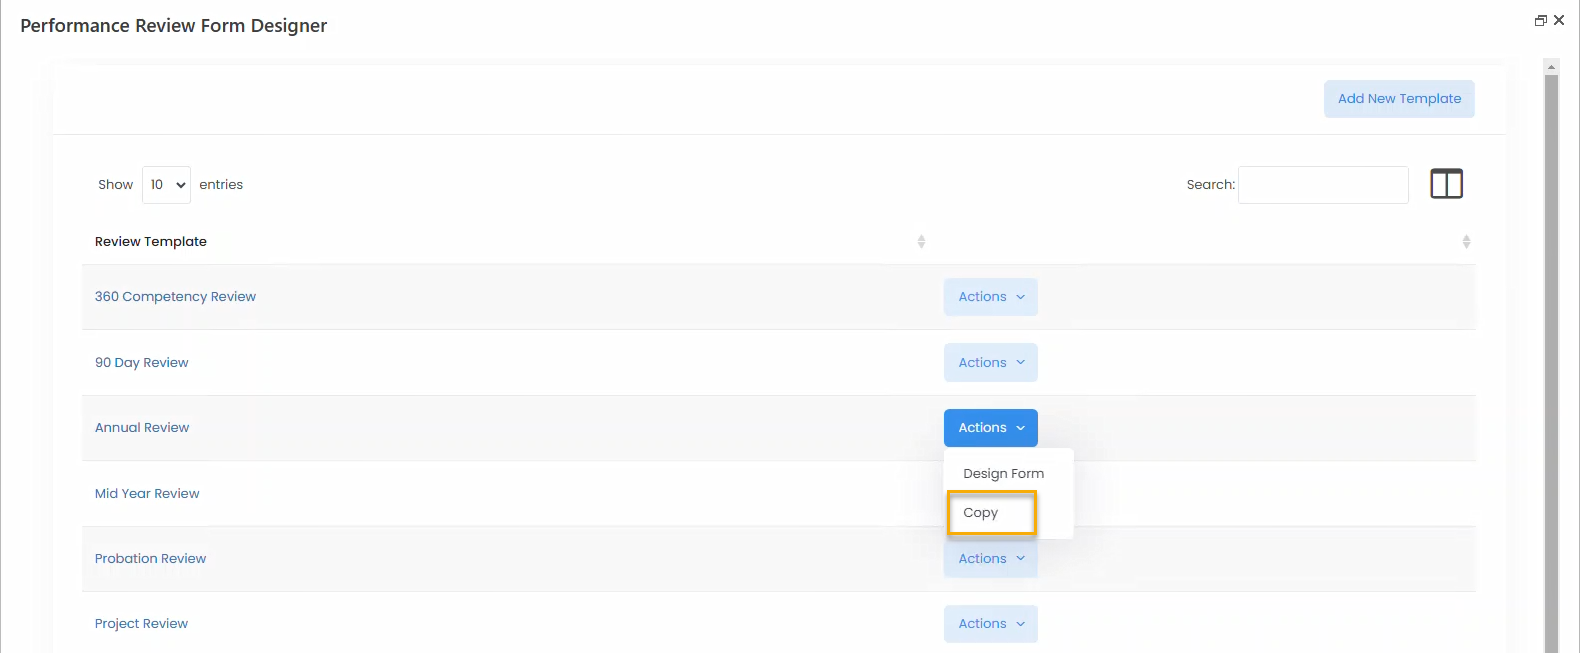
- Click Actions > Copy next to the performance review form you want to copy.
- Click OK on the confirmation message that appears.
- Click Actions > Design Form next to the created performance review form (the created performance review form will have the same title as the source performance review form with _Copy added to its title) and make necessary changes.
Delete Performance Review Form
To delete a performance review form:
- Go to Settings > Settings and Configuration > Performance.
- Click Performance Reviews in the left panel and click Edit next to the Performance Review Form Designer setting name on the Basic tab.
- Click on the title of the performance review form you want to delete.
- Click Delete Item on the View tab.
.png)
- Click OK on the confirmation message that appears.