Lanteria HR provides tools for automating general HR processes, such as onboarding, employee termination, etc. All HR processes are based on process templates, which must be set up according to your process workflow. The templates define typical processes and action items they require. After the templates are created, HR processes with due dates etc. can be started either automatically or manually based on the template.
Create Template
Follow these steps to create or modify an HR process template:
- Go to Settings > Settings and Configuration > Core HR.
- Click Processes and Approval Workflows in the left panel and click Edit next to the HR Processes setting name on the Basic tab.
.png) The Process Templates window will appear.
The Process Templates window will appear. 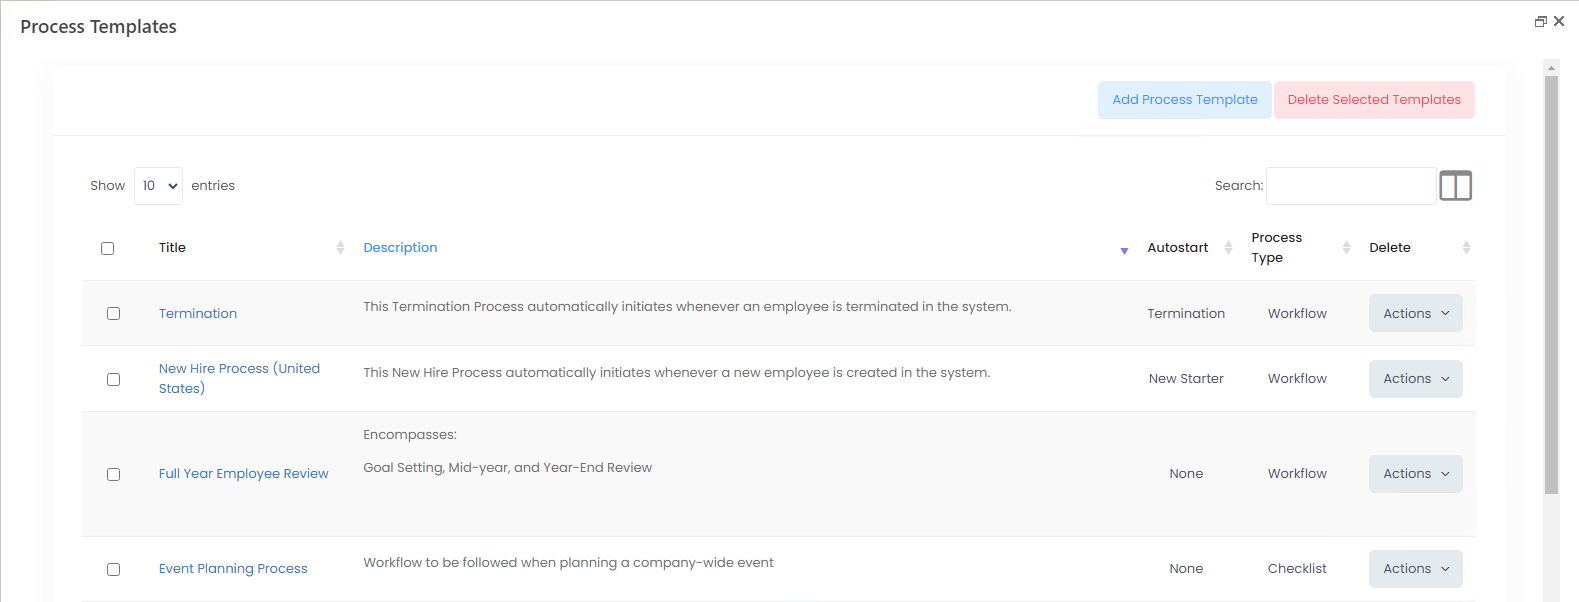
- To add a new HR process template, click the Add Process Template button.
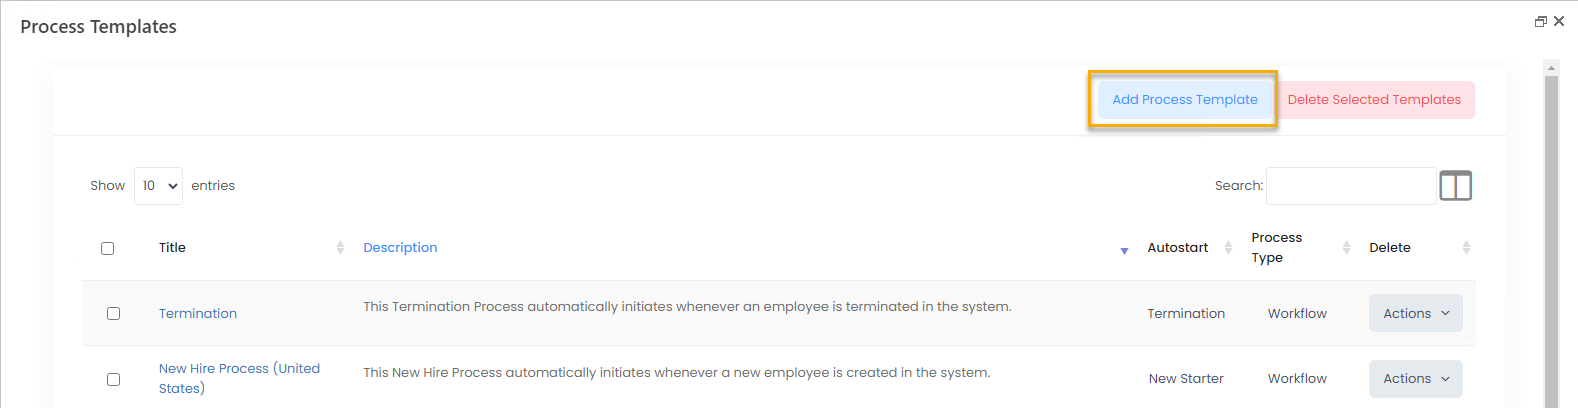
- The Process Template Designer window will open.
.png)
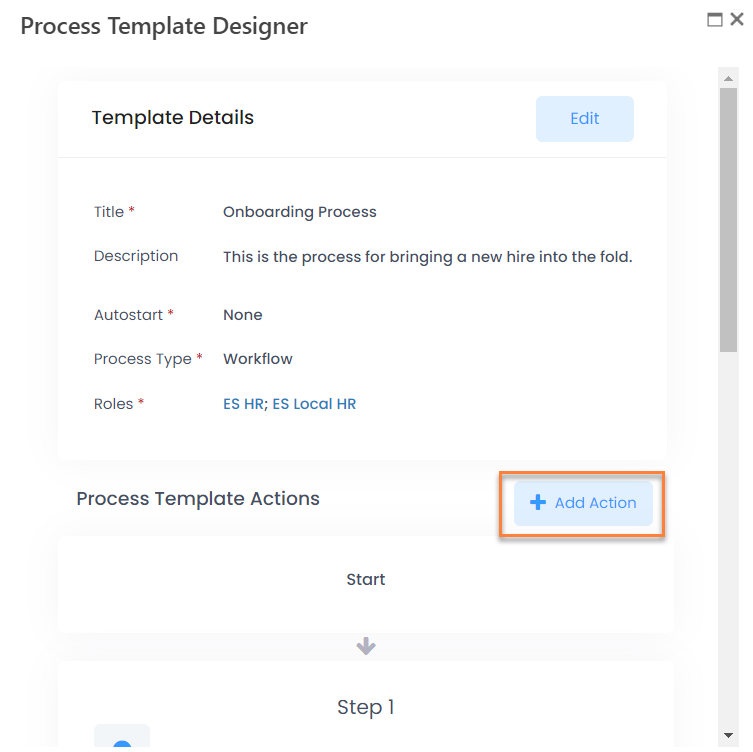
- Specify the template name in the Title field and add the template description in the Description field.
- The Autostart field serves to specify whether the process should be started automatically after some event. There are four options available: None serves to start the process manually each time; New Employee, New Starter and Termination serve to start the process automatically each time when a new employee or starter is created or when an employee is terminated, respectively. If the process template is set up to start automatically, an HR process will be created with all the action items assigned to the template.Note
To be able to use the OnBoarding functionality, there must be a template with the Autostart field set to New Starter. Similarly, for OffBoarding there must be a template with Autostart set to Termination.
In case the Autostart field is set to None, the process should be started manually by going to Core HR > Processes > HR Processes and clicking Start Process on the ribbon or Start HR Process at the top of the form.
.png)
- If you set the Autostart field to New Employee or Termination, additional optional filters become available that allow you to select specific countries, locations, job roles, and employment types, for which this HR process will be started automatically. Filling in these filters may be useful if, for example, you have different on-boarding or off-boarding process for different countries, locations, job roles or employment types in your organization. If you leave these filters empty, the HR process will be automatically started for all locations, countries, job roles, and employment types. Fill in additional filters if necessary. Otherwise, skip this step.
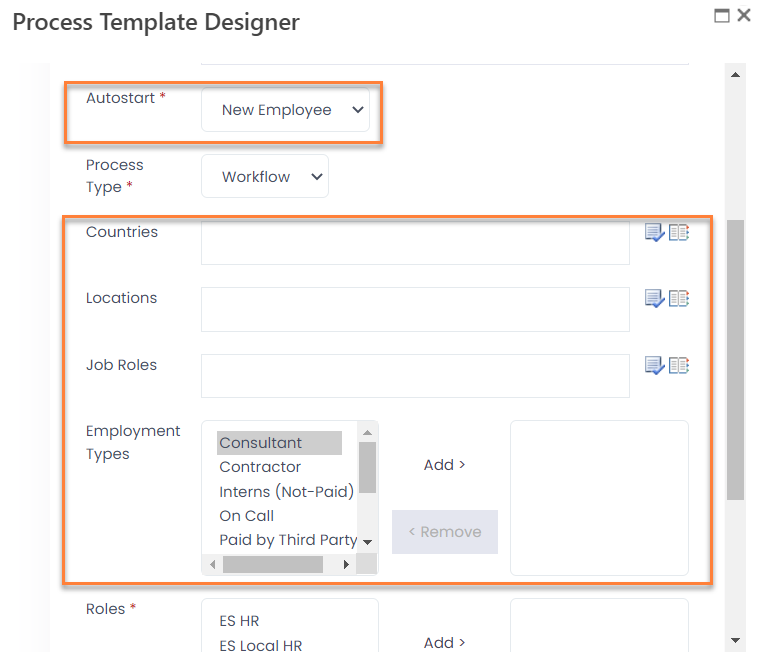
- If you set the Autostart field to New Starter, additional optional filters become available that allow you to select job roles and employment types, for which this HR process will be started automatically. Filling in these filters may be useful if, for example, you have different on-boarding processes for different job roles or employment types in your organization. If you leave these filters empty, the HR process will be automatically started, irrespectively of the job role and employment type. Fill in additional filters if necessary. Otherwise, skip this step.NoteThe Job Role and Employment Type for a starter are those specified for the job opening the started is being hired for.
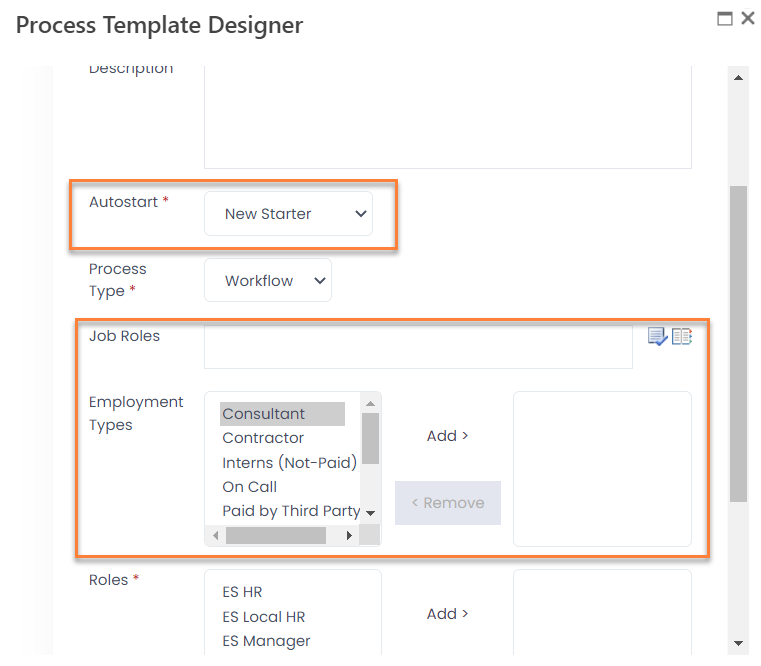
- Specify the process type in the Process Type field. The two options available are:
- Checklist, which means the action items can be performed simultaneously and are generated all at once
- Workflow, which means the action items should be performed in a specific order and are generated one by one
- In the Roles field, select roles that will be able to start this process. Select a role in the left column, and then click Add to add a role to the list of allowed roles. To removed a role from the list of allowed roles, select it in the right column, and then click Remove. You can select one of the following roles: HR, Local HR, or Manager.
- Click Save.
Add Actions to Template
After you save the template, a new dialog opens where you can add the action items, that is, tasks that the responsible will perform, to the template.
- Click the Edit button in the upper part of the form to modify the template details.
.png)
- Click the Add Action button to add action items to the process.
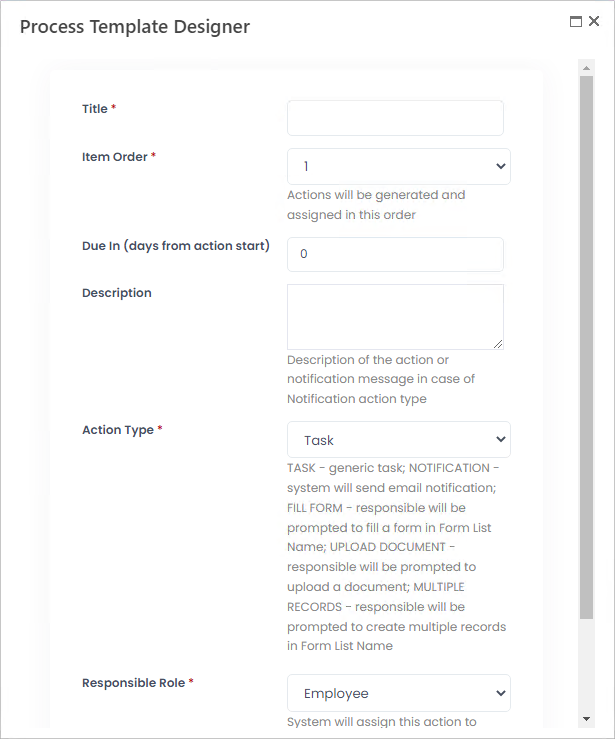
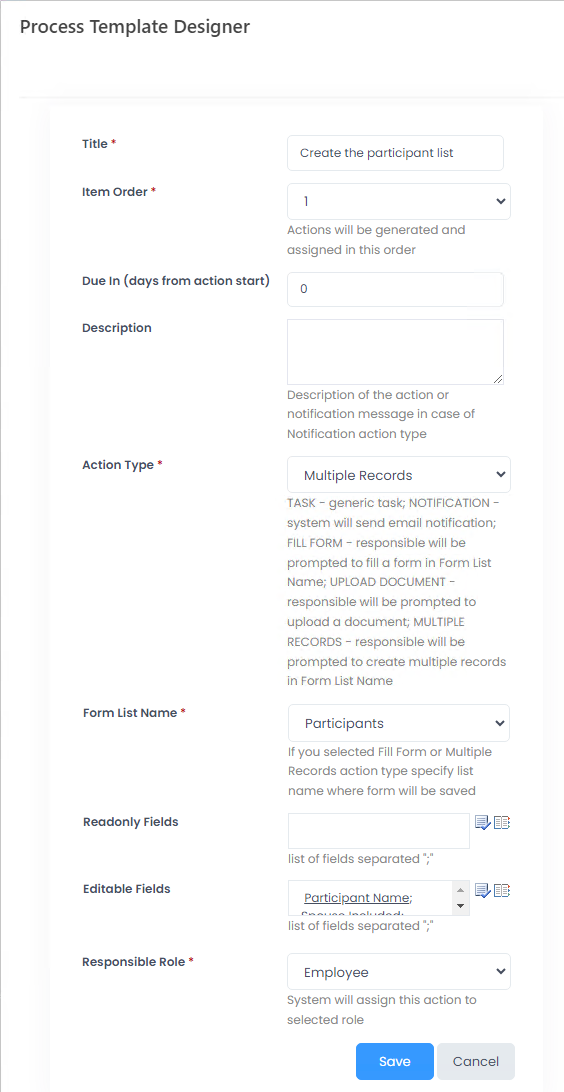
- Type the action name in the Title field and a detailed description of the action item in the Description field.
- Use the Item Order field to specify the sequence of actions in the process.NoteIf your process has both checklist and workflow-type parts, meaning that there are actions that can be performed simultaneously, you may assign the same item order value to those action steps. This will mean that these steps will be assigned to responsible role / persons at the same time.
- In the Due in (days from action start) field, specify the number of days from the action item generation during which the task must be completed. NoteIf the HR process is launched manually and the future process start date is selected, the due date is calculated based on the HR process start date.
- Select the process action type:
- Task: a generic task will be created for the responsible person
- Notification: an additional Notification Recipient field will be displayed after selecting this action type and a notification e-mail will be sent to the person specified in this field.
- Fill Form: to complete a step of this type the responsible person should fill in a form. To do this successfully you must create a SharePoint list in the system for storing the information provided in this form in Settings > Site Lists and Libraries, and then select the internal list name in the Form List Name field of that is displayed after this action type is selected.
- Multiple Records: to complete a step of this type the responsible person should fill in a form where multiple records can be entered. To set up an action item of this type, a SharePoint list must be created to store the entered information. The internal name of such list is specified when adding the Multiple Records action type to the template.
- Upload document: to complete a step of this type a document should be uploaded to the system. Select the document library where the uploaded documents will be stored in the DocLibrary field that is displayed after this action type is selected.
- Select who is responsible for this action in the Responsible Role field. The following options are available:
- Employee: the action will be assigned to the employee for whom the process has been initiated. For example, in case of the termination process, employee being terminated
- Manager: the action will be assigned to the line manager of the employee or starter for whom the process has been initiated
- Custom: the action will be assigned to a specific employee. Select the responsible employee's name in the Custom Responsible field, which appears after you select this option
- Starter: the action will be assigned to the starter for whom the process has been initiated. This option will be used for the pre-employment (onboarding) processes
- Local HR: the action will be assigned to the Local HR of the employee or starter for whom the process has been initiated
- Job Role: the action will be assigned to the employees holding a particular job role. Select the job role in the Job Role field, which appears after you select this option. Please note that the system will identify all employees with the selected role and assign this task to all of them
- Working Group: the action will be assigned to a specific working group. Select the group in the Working Group field, which appears after you select this option
- HR: the action will be assigned to all employees belonging to the HR group
When the process is launched, the process steps will be assigned to the responsible person. An employee can view the list of the HR process tasks assigned to him on My Actions page in the My Details menu.
- Click Save.
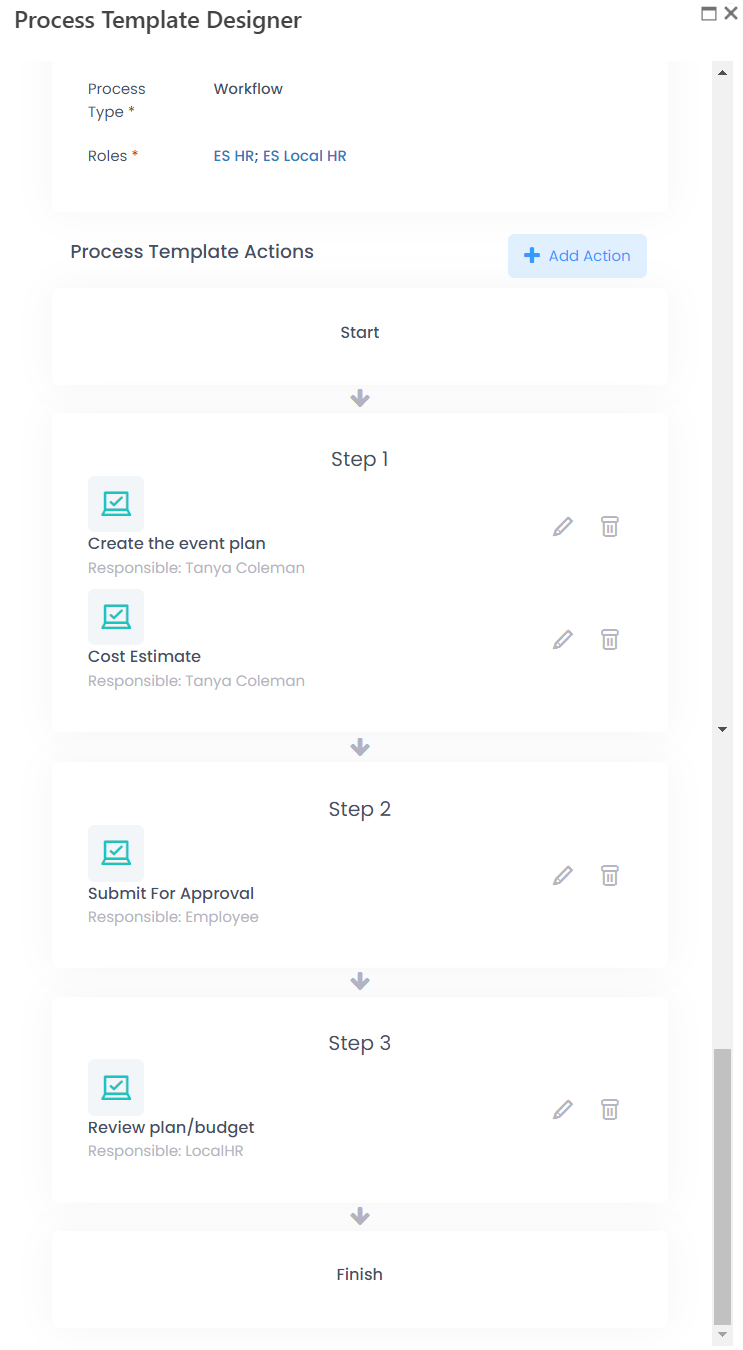
- Add as many activities as is necessary for the process.
- To edit an activity click the edit activity icon next to the action's name.
- To delete an activity from the process click the delete activity button next to the activity name.
Adding Fill Form Action
When you design an HR process template, you can add an action with the Fill Form type. For example, an action with a checklist or questionnaire as action steps. When the HR process actions are assigned to an employee, such employee will see the Fill Form button next to the action item. The form can be viewed from the upper right corner of the Process Actions.
.png)
After clicking Fill Form, the form will open for editing:
.png)
To add an action of the Fill Form type to an HR Process template:
- Create a custom list the Fill Form action will be based on. The basic information types that you can use for fields in your custom list for your HR process are the following:
Field Information Type Description Single line of text Can be used to add a text field. The field value can contain up to 255 characters. Multiple lines of text Can be used to add a text field that can contain more text as well as other elements. You can choose to add plain or rich text with pictures, tables, etc. Choice Can be used to add an option field. You can add as many choices as needed and display them in a drop-down menu, as radio buttons, check boxes, etc. Number Can be used to add a field where the user can enter a number. You can specify the minimum and maximum values, and choose to display it in percentage if necessary. By Selecting Calculated Value, you can add a formula in the SP format and the system will perform automatic calculations for this field (note that this is an advanced option; possible formulas can be found in the SP tutorials). Currency Can be used to add a field where a currency can be specified. Date and Time Can be used to add a date field. Lookup Can be used to add a field that will be connected with the fields in another list. using this property, you can add a few non-lookup fields from one list. Yes/No Can be used to add a check box. NoteSharePoint provides the ability to add fields with more information types. However, other types require advanced SharePoint knowledge. - You can have data in your custom list automatically populated from any fields of the Employees, Starters or Salary Details lists. Also, this option is available for the Termination Date field from the Terminations list. If you want to do so, create a column with the title Employee_InternalFieldName (for the Employees list), Candidate_InternalFieldName (for the Starters list), Sd_InternalFieldName (for the Salary Details list) or Employee_TerminationDate (for the Terminations list). For example:
- To populate an employee's/candidate's full name, create a column with the title Employee_Title or Candidate_Title with the single line of text information type.
- To populate an employee's first and last names, create two columns with titles Employee_FirstName and Employee_LastName with the Single line of text information type.
- To populate an employee's/candidate's org unit, create a column with the title Employee_Department or Candidate_Department with the Lookup information type (lookup to the Organizational Units list).
- To populate the employee's employment date, create a column with the title Employee_EmploymentDate, with the Date and Time information type. To populate the candidate's start date, create a column with the title Candidate_StartDate, with the Date and Time information type.
- To populate a job role, create a column with the title Employee_JobRole or Candidate_JobRole with the Lookup information type (lookup to the Job Role list).
- To populate the employee's termination date, create a column with the title Employee_TerminationDate, with the Date and Time information type.
- Create an HR process template or edit an existing one.
- In the Template Details window, click Add Action.
- In the Title field, type a title of the section.
- In the Item Order field, select the order number of this action.
- In the Action Type field, select Fill Form.
- In the Form List Name field, select your custom list that was created for this Fill Form action.
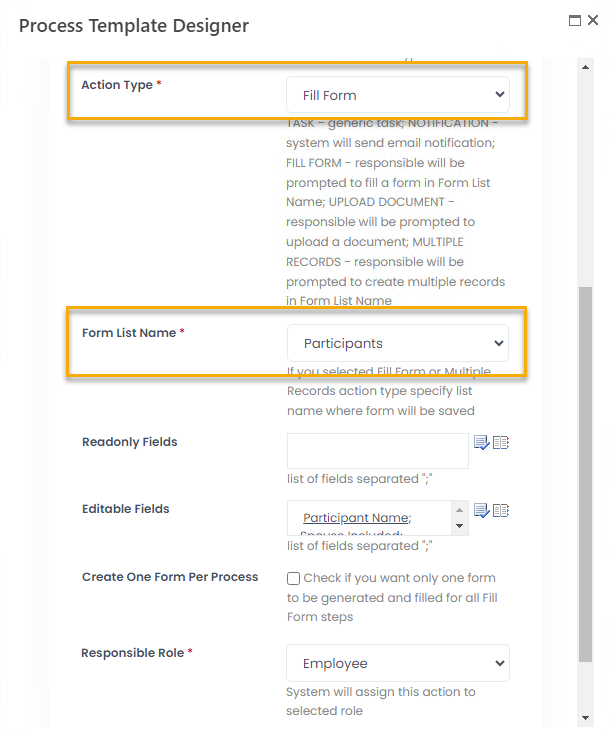
- Use Readonly Fields to select fields from the custom list that you don’t need to be edited by the responsible role user at this step.
- Under Editable Fields, select fields from the custom list that you need to be editable by the responsible role user at this step if necessary. NoteWhen working on the action item, the responsible user will be able to view and edit only fields from the list that were selected as read-only and editable. Whereas, HR will see all the list fields when viewing the process details from the Process Actions > Process Forms.
- If you need to have only one form to be generated and filled for all Fill Form steps, select the Create One Form Per Process check box. NoteYou can still view how the responsible employees filled in their forms from the My Task History (in the employee role menu, click My Details > My Task History, select an action item of the corresponding process and click View to open the Process Actions form).
- In the Responsible Role field, select a role that will be responsible for this action step, and then click Save.
Adding Multiple Records Action
The Multiple Records action is similar to the Fill Form action type. To complete the action of this type, the responsible person will be also completing the form, but can enter multiple records into it.
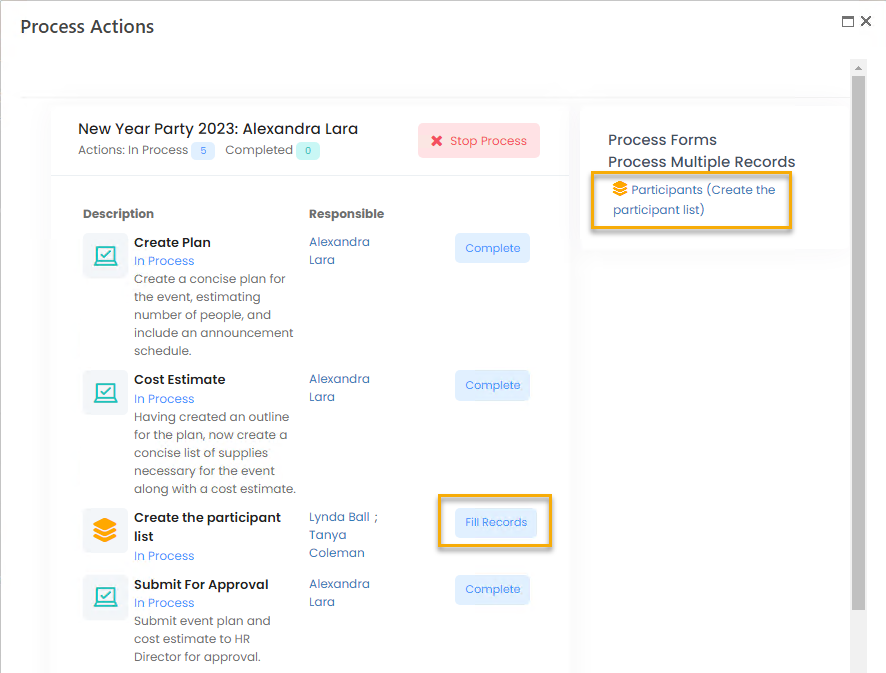
To complete the action, click Fill Records and enter data using the Add button. 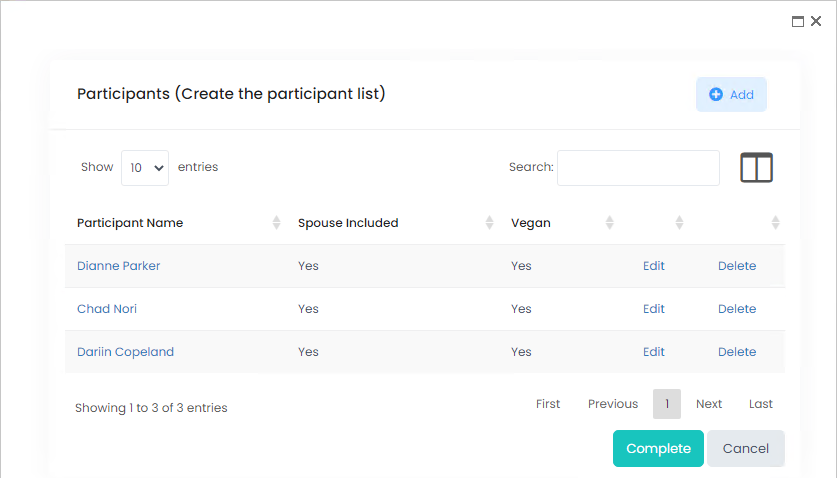 To add action of the Multiple Records type, follow the same steps as described for the Fill Form action, but in the Action Type field, select Multiple Records.
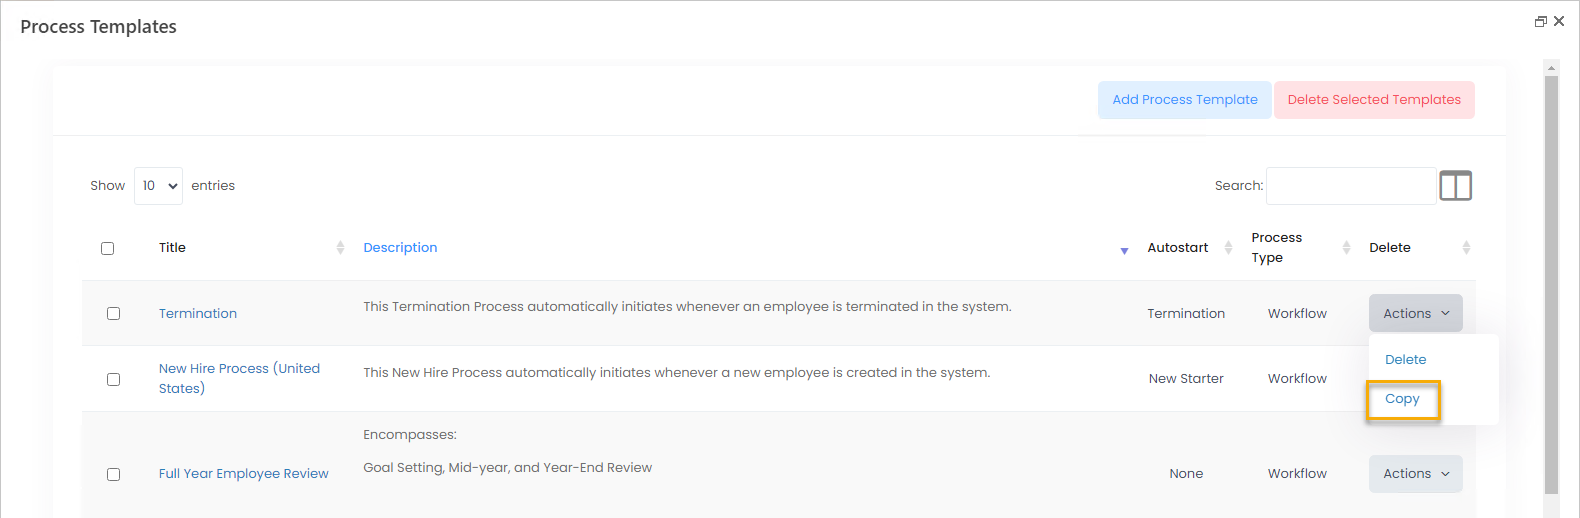
Create Template by Copying
Process templates can be created by copying existing ones. All the template settings and action items will be copied as well. To copy a template, follow these steps:
- Go to Settings > Settings and Configuration > Core HR.
- Click Processes and Approval Workflows in the left panel and click Edit next to the HR Processes setting name on the Basic tab.
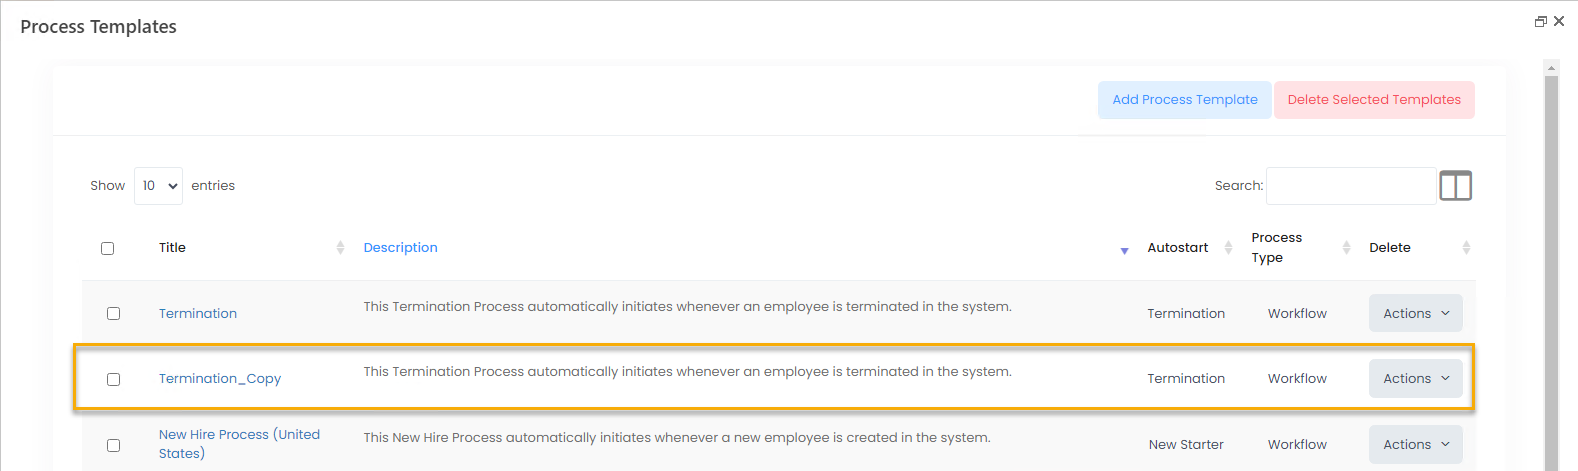
- On the Process Templates page that opens, select a template to be copied and click Actions > Copy.
- Click OK when the confirmation message pops up. The copy of the template will be created.
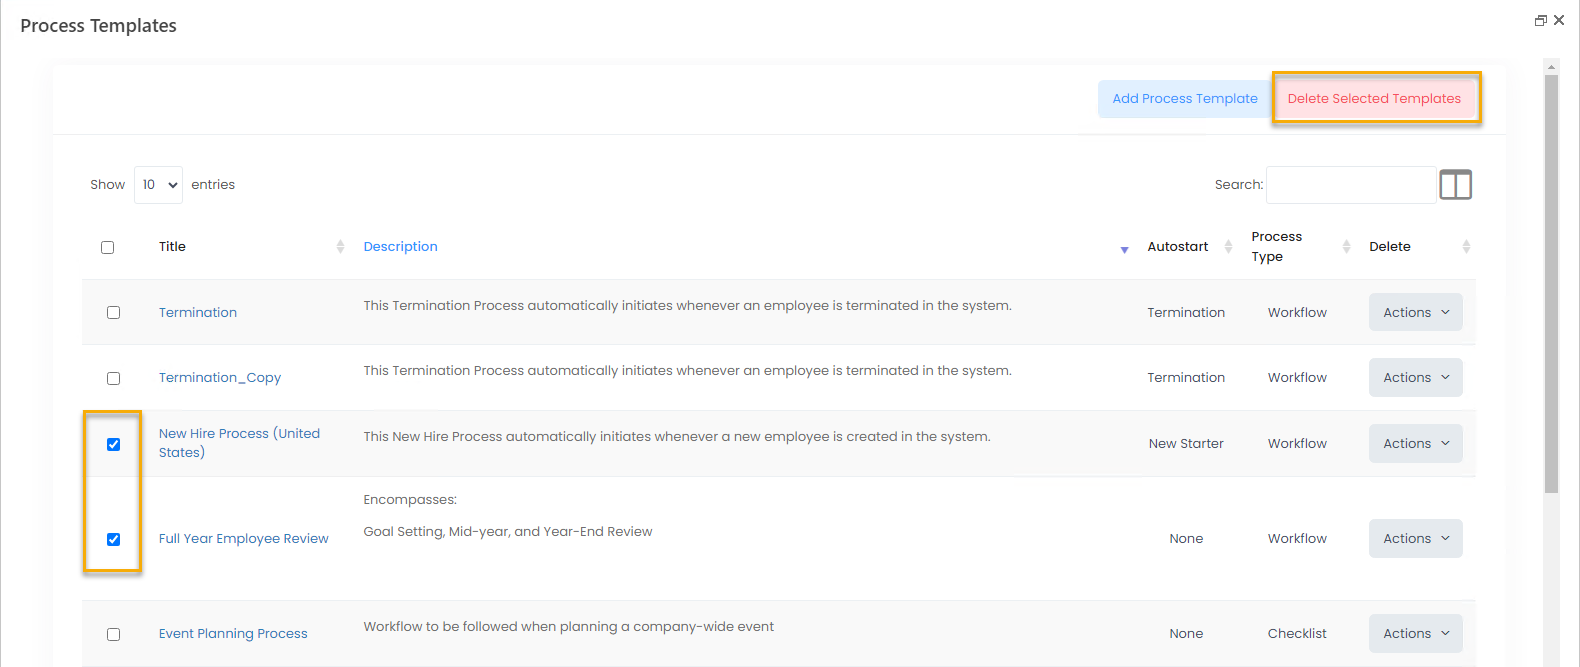
Delete Process Template
To delete one or several process templates, select the check boxes next to the titles of the process templates that you want to remove, and then use the Delete Selected Templates buttons at the top of the page. Select OK on the confirmation message that appears.