When creating a job opening, you can choose in the Job Publishing section whether the job opening is to be published and where.
.png)
The titles of publishing options, selected in the Publish To field, are customizable, but are based on predefined publishing types that provide you with the ability to publish a job opening internally in Lanteria HR, and/or on the web, on such places as your company web site (Candidate Self-Service), the SEEK employer site, JobTarget or another site integrated with Lanteria HR.
To be able to select a place where a job opening will be published on, job publishing options must be set up.
To set up job opening publishing options
- Go to Settings > Settings and Configuration > Recruiting.
- Click Job Publishing in the left panel, and then click Edit next to Job Publishing Options.
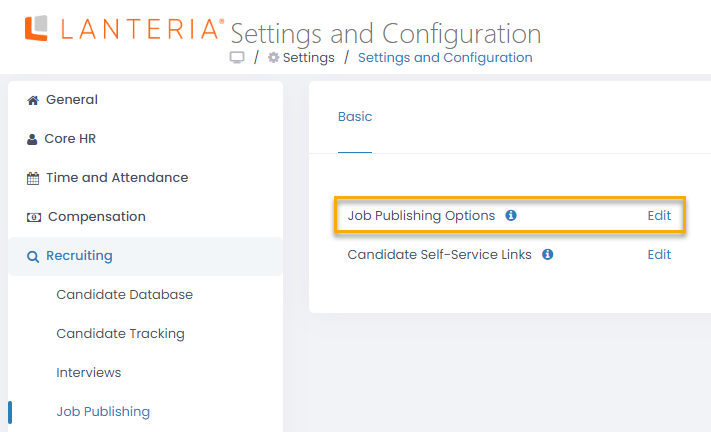
- To add a new job publishing option, click Add Publishing Option in the Job Opening Publishing Options window. To edit a publishing option, click its title.
.png)
- In the Title field, specify the title for the job publishing option that will be displayed in the Publish To field when creating a new job opening.
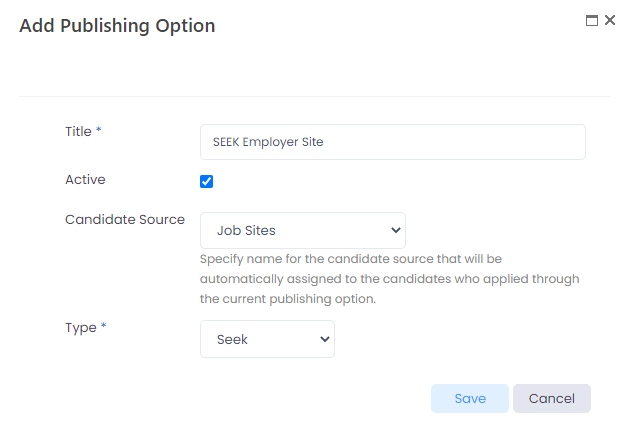
- Select the Active check box to enable this job publishing option when creating job openings.TipIf you do not plan to use a publishing option, it is recommended that you deactivate it rather than delete it so that you could quickly enable it when necessary rather than reconfigure from scratch.
In the Type field, select the publishing type that defines a place where a job opening will be published:
- Intranet – A job opening will be published internally in Lanteria HR to make it available to Lanteria HR employees through the Employee menu (My Company > Job Openings).
- Career Portal – A job opening will be published on the company website, and the candidates will be able to apply through the Candidate Self-Service. Please note that for this option to work, Candidate Self-Service site is to be installed and set up.
- SEEK – A job opening will be published on the SEEK employer site, from which it can then be posted on Australia's top jobs, employment, career and recruitment site. Set up this job publishing option if you use integration with SEEK.
- JobTarget – A job opening will be first published on the Candidate Self-Service site, from which it will be retrieved by the JobTarget job posting distribution platform, from which it will be available for publishing on multiple sites and platforms.
- ZipRecruiter – A job opening will be first published on the Candidate Self-Service site, from which it will be retrieved by the LHR - ZipRecruiter Integration job and sent to ZipRecruiter where it can be managed and published on the ZipRecruiter platform. Set up this job publishing option if you use integration with ZipRecruiter.
- Talenteria – A job opening will be published (through the Candidate Self-Service site) on sites created in Talenteria, configured in the Talenteria job publishing option. Set up this job publishing option if you use integration with Talenteria.
- LinkedIn – A job opening will be first published on the Candidate Self-Service site, from which it will be retrieved by the LinkedIn Recruiter platform into your LinkedIn Recruiter dashboard and posted on LinkedIn, and for some LinkedIn Learning - ensuring the jobs on LinkedIn are always up to date. Set up this job publishing option if you use integration with LinkedIn.
- In the Candidate Source field, select the candidate source that will be assigned to the candidates automatically created in Lanteria HR based on their application through the current option.
- Click Save.
- Create more publishing options if necessary. You can create several publishing options with the same type. This may be necessary, for example, if you have several career portals and want to have them all available for selection when choosing where to publish a job opening.
After saving a publishing option, a GUID (Globally Unique Identifier) will be generated for it. This unique identifier is used when setting up Lanteria HR and external web site integration for publishing the job openings and exchanging the application data.
.png)
Advanced/Additional Settings
After a job publishing option has been created, you need to also configure advanced/additional settings for publishing options with the Career Portal, SEEK, JobTarget, and ZipRecruiter types. For the SEEK, JobTarget, and ZipRecruiter types, configuring additional settings is mandatory for the corresponding integration to work.
To configure advanced settings for a publishing option with the Career Portal type
- In the Job Opening Publishing Options window, click Settings for a publishing option with the Career Portal type.
.png)
- In the Settings window, in the Self-Service Site URL field, enter the URL of the Candidate Self-Service site on which a job opening will be published when this job publishing option is used. This URL will be used to generate a link to the career portal on the Job Publishing tab in the Job Opening Details window. If you leave this field empty, a job opening will still be published, but the link to the career portal will not be available in Lanteria HR in the job opening details.


.png)
- Click Save.
To configure advanced settings for a publishing option with the SEEK type
- In the Job Opening Publishing Options window, click Settings for a publishing option with the SEEK type.
.png)
- In the Settings window, fill in the fields as described below:
.png)
- Client ID – Specifies the ID of the SEEK client. This ID is generated when you create an account on the SEEK employer site.
- Client Secret – Specifies the secret code that is generated when you create an account on the SEEK employer site.
- Advertiser ID – Specifies the ID of the advertiser, tailored to your account on the SEEK employer site. You can create several job publishing options of the SEEK type for different advertisers if necessary. However, you can publish a job opening only for one SEEK publishing option (one job opening for one SEEK advertiser).
- Converted Advertiser ID - Displays a unique identified required for the SEEK authorization. It is generated based on the specified client ID, client secret and advertiser ID after you click Validate or Save.
- Self-Service Site URL – Specifies the URL of the Self-Service site to which a candidate can be redirected to fill in the application form when they apply for a job from SEEK. If you want such redirect to be performed, set up the Candidate Self-Service configuration.json file accordingly.
- Click Validate to validate you SEEK authorization data and generate Converted Advertiser ID.
- Click Save.
To configure advanced settings for a publishing option with the JobTarget type
- In the Job Opening Publishings window, click Advanced Settings for a publishing option with the JobTarget type.ImportantA JobTarget account is created once when you are configuring advanced settings for the JobTarget publishing option for the first time. You will not be able to repeat these steps.
.png) NoteThe Environment: Production icon indicates that you are setting up the JobTarget publishing option for the production/live environment. Lanteria HR can also be configured in such a way that this specific setup is performed on a test environment for testing purposes. In this case, the Environment: Test icon will be displayed. Contact your Lanteria HR administrator in case you to configure test environment for this setup.
NoteThe Environment: Production icon indicates that you are setting up the JobTarget publishing option for the production/live environment. Lanteria HR can also be configured in such a way that this specific setup is performed on a test environment for testing purposes. In this case, the Environment: Test icon will be displayed. Contact your Lanteria HR administrator in case you to configure test environment for this setup. - In the Settings window, under Create JobTarget Company, in the Company Name field, type the name of your company, and then click Create. This will create a company on the JobTarget site, to which job openings posted with this integration will be related to.NoteThis step is performed only once when you are configuring advanced settings for a JobTarget job publishing option for the first time. You will not be able to repeat this step after you proceed.
- Click OK on the confirmation message that appears.
Under Create JobTarget Company Recruiter User, fill in the fields as described below to create a new JobTarget account:
- First Name – Specify the first name of the JobTarget user that will be used to create a JobTarget account.
- Last name – Specify the last name of the JobTarget user that will be used to create a JobTarget account.
- Email – Specify the email of the JobTarget user that will be used to create a JobTarget account.
Click Create to create a JobTarget user account using the provided information.
NoteThis step is performed only once when you are configuring advanced settings for a JobTarget job publishing option for the first time. You will not be able to repeat this step after you proceed.Click OK on the confirmation message that appears.
.png)
In the Self-Service Site URL field, type the URL of the Self-Service site that will be used to generate links to Lanteria HR and JobTarget to published openings in the Self-Service site. When you publish a job opening with the JobTarget job publishing option, the job opening is first published to a Self-Service site specified here. The link to the job opening on the Self-Service site will be provided both in the job opening published by JobTarget as well as in Lanteria HR. You will be able to change this URL later if necessary.
The Self-Service Site URL field value must be as follows:
https://yoursssitedomain where "yourssdomain" is the domain name of your Self-Service site. Note that for this URL, the http protocol is also acceptable.In the Job Opening Web API Feed URL field, specify the web API URL that will be used by JobTarget to retrieve new job openings from the Self-Service site. You will be able to change this URL later if necessary.
The Job Opening Web API Feed URL setting value must be as follows:
https://yourssAPIdomain:port/api/ApSSAPI/GetJobOpeningsForJobTarget where "yourssAPIdomain:port" is the domain name and port of your Self-Service API, which is used to connect Lanteria HR and Self-Service. Note that this domain name is normally different from the Self-Service site domain name.Click Save to finalize the configuration of integration with JobTarget.
If you open advanced settings for a JobTarget job publishing option after it has already been configured, you will only be able to change the Self-Service site URL and job opening web API feed URL. The company name and recruiter email, which were created during initial configuration, are displayed at the top of the advanced settings, however, they are not editable at this stage.
The Log in to JobTarget button in the JobTarget job publishing option advanced settings is used to log in the JobTarget site where you can edit job openings published with this option preview them, and post to other platforms, provided by JobTarget.
The Log in to JobTarget button in the JobTarget job publishing option advanced settings is the only for you to log in to JobTarget to be able to manage job openings retrieved from Lanteria HR. Do not log in directly on the JobTarget site.
To configure advanced settings for a publishing option with the ZipRecruiter type
- In the Job Opening Publishing Options window, click Settings for a publishing option with the ZipRecruiter type.
.png)
- In the Settings window, in the Self-Service Site URL, enter the URL of the Self-Service Site that will be used for integration with ZipRecruiter. Job openings published from Lanteria HR with the ZipRecruiter job publishing option, first will be published on this Self-Service site, from which they will be retrieved by the LHR - ZipRecruiter Integration job and sent to ZipRecruiter.
.png)
- Click Save.
To configure advanced settings for a publishing option with the Talenteria type
- In the Job Opening Publishing Options window, click Settings for a publishing option with the Talenteria type.

- In the Settings window, click the
 icon next to the Client ID and Client Secret fields to generate the client ID and client secret correspondingly, and then copy and save the generated values.
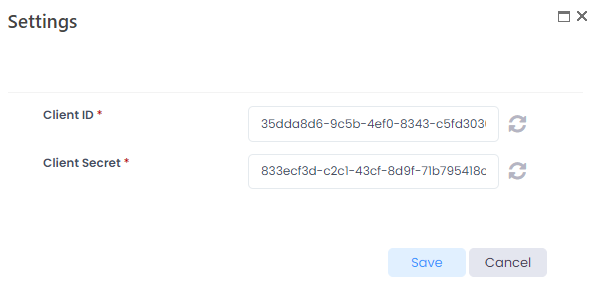
- Click Save.
- In your Talenteria, configure the Lanteria HR Integration settings: go to Settings > System Settings > Integration tab and configure the following:
- Select the Active check box next to Lanteria HR. Additional configuration fields become available.
- Base Url – Specifies the URL of the Lanteria HR Self-Service site. Lanteria HR job openings will be retrieved from this site.
- Client Id – Specifies the client ID of Lanteria HR. This client ID is a public identifier of the app. Paste the client ID that you generated in Lanteria HR, in the settings of the Talenteria job publishing option, into this field.
- Client Secret – Specifies the client secret of Lanteria HR. A client secret is a secret known only to your application and the authorization server. Paste the client secret that you generated in Lanteria HR, in the settings of the Talenteria job publishing option, into this field.
- Get Jobs from Lanteria – If this check box is selected, jobs (job openings) created in Lanteria HR with the Talenteria job publishing option will also be automatically sent to Talenteria. Talenteria retrieves job openings through the Self-Service site, but job openings published with the Talenteria job publishing option are not shown on the Self-Service site.
- Post Candidates to Lanteria HR – If this check box is selected, candidates created in Talenteria will also be automatically sent to Lanteria HR.
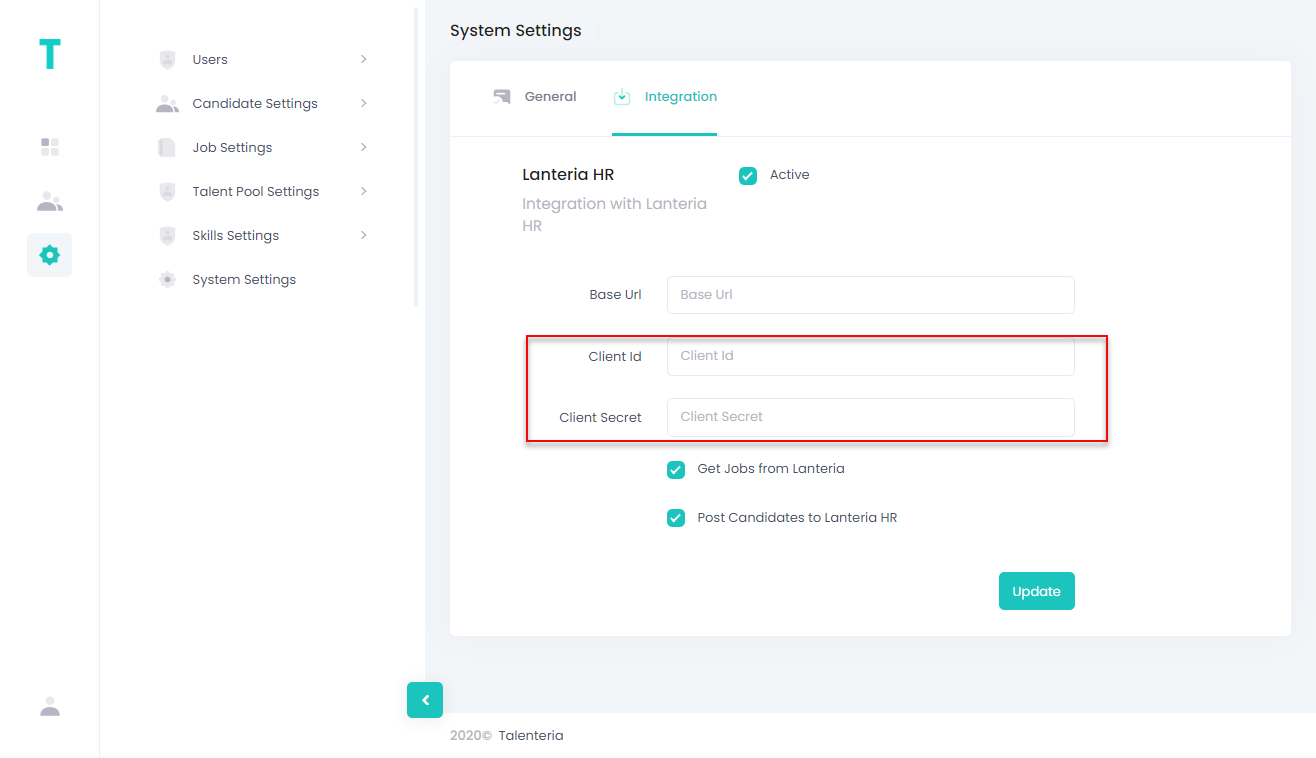
- Click the Update button.
After you have set up the job publishing options, you can publish job openings advertisements to the places you set up when you create a job opening.