Candidate documents can be managed on the Candidate Documents page, which can be opened:
- from the candidate card (click Candidate Documents on the candidate card ribbon; if the candidate card is displayed in the alternative mode, locate the Candidate Documents section in the card)
- or from the Candidate Tracking page (go to Recruiting > Candidates > Candidates, and then click Actions > View Documents next to a candidate).
From the Candidate Documents page, you can perform the following operations:
- Upload candidate documents. To do this, on the Candidate Documents page, click Upload document. Enter the type of the document, and specify the job opening. Select the Manager Access and/or Recruiting Manager Access check boxes to restrict access to the uploaded document for the manager and/or recruiting manager correspondingly. Click Upload Document, and then, on the next page, specify the title of the document, and click Save. If you do not specify the title, the file name will be used as a title. Candidate documents can also be uploaded when you are creating or editing a candidate.
.png)
- Download candidate documents. To do this, on the Candidate Documents page, select one or several documents, and then click Download selected as ZIP.
- View Predictive Index reports, received from the Behavioral Index, in case integration with Predictive Index is used.
- Send uploaded documents to the Self-Service site where the candidate can electronically sign them using the DocuSign service or Adobe Acrobat Sign service. To be able to send documents for electronic signature, the DocuSign integration or Adobe Sign integration must be enabled and configured. For the DocuSign, it is critical that document has the correct sign here tag anchor string, which is specified in the DocuSign integration settings. To send a document for signature, on the Candidate Documents page, select one or several documents, and then click Send selected to DocuSign or Send selected to Acrobat Sign. The Sign Status field shows the signature status of the sent document. This status is updated after the candidate applies an electronic signature on the Candidate Self-Service site or declines the signature. For detailed information on how to electronically sign candidate documents, see DocuSign Candidate Documents and Sign Documents through Adobe Sign.
.png)
Note
When managing document signing directly on the DocuSign site, note the following two cases:
- If a document was deleted or voided from the DocuSign site by the administrator, the document will be removed from the My Documents page on Candidate Self-Service and its sign status will be cleared on the Candidate Documents page in Lanteria HR. However, this does not happen immediately - the document is deleted from Candidate Self-Service and the sign status is cleared in Lanteria HR by a special job, which is run automatically once a day. A document pending deletion will not be signable on Candidate Self-Service. After the sign status is cleared in Lanteria HR, the document can be resent from Lanteria HR to Candidate Self-Service for signature again if necessary.
- If a document was signed directly through the DocuSign site by the administrator, its sign status in Lanteria HR as well as the document itself will not be immediately updated in Lanteria HR or on the Candidate Self-Service site. The status and the document will be updated by a special job, which is run automatically in Lanteria HR once a day.
To prepare a document to be signed through Adobe Acrobat Sign, refer to this topic.
To prepare a document that you want to be DocuSigned, follow these steps:
- Create a document that you going to send to the candidate for electronic signature or use an existing document.
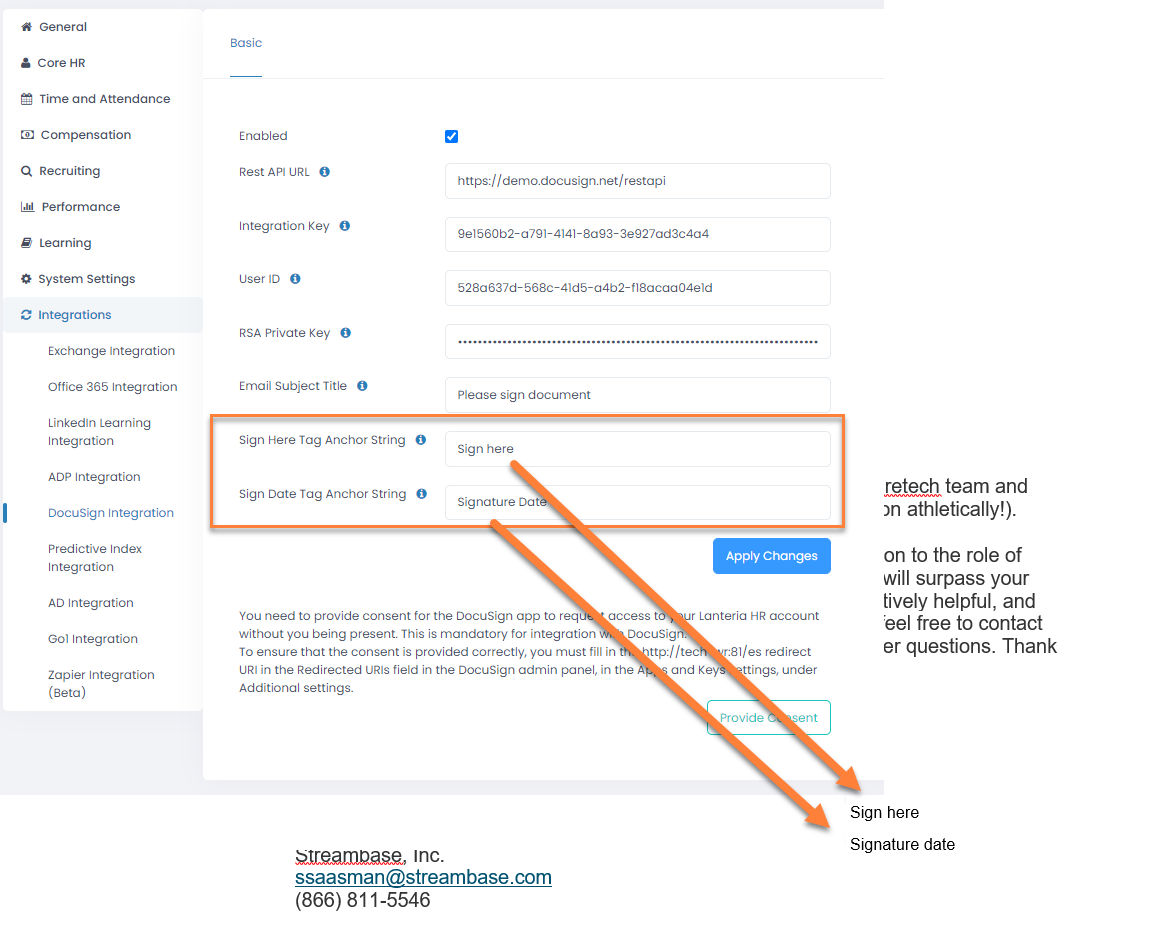
- At the spot where you want to have a signature applied, add the sign here tag anchor string, which is specified in the Sign Here Tag Anchor String field in the DocuSign integration settings. The signature will be applied right next to it, while the string itself will remain visible. This tag is mandatory, otherwise the signer will not be able to DocuSign the document.
- At the spot where you want to have a signature date automatically added after the document has been DocuSigned, add the signature date tag anchor string, which is specified in the Sign Date Tag Anchor String field in the DocuSign integration settings. This tag is optional.TipYou can hide the Sign Here Tag Anchor String and/or Sign Date Tag Anchor String tag in a document that is going to be electronically signed by making the tag font color identical to the document background (typically white). This will still allow the program to identify the place where the electronic signature and signature date must be located in the document, but the tag text will not be visible; only the signature and, if the signature data tag was added, signature date will be displayed. The signer will be able to identify the place where to DocuSign the document by the
 icon.
icon. - Save the document in the PDF format.
Now this document is ready to be uploaded to the list of candidate documents and sent to the Candidate Self-Service to be DocuSigned by the candidate.